

On this page you will find descriptions and examples for different types of projects you can create to demonstrate your knowledge of STEM concepts. The table below is a Choice Board with links to the project descriptions further down on this page. It is organized according to available software categories, and videos for how to use the software can be found on the Software Training page. This table is not meant to be an exhaustive list as there are as many possible types of projects as your imagination. This list is just to get you started and provide ideas, along with some good examples.
Here is a downloadable PDF version of the Choice Board with color-codes to tell the different categories of software apart. Each type of project is described, but there are endless possibilities for the projects you can create using browser-based media design software. More complete descriptions and examples of each kind of project are listed below. Click on the links in the table above to go to each description.
Comic Book or Graphic Novel:

For any topic or concept in a STEM class, a comic book or complete graphic novel can be an effective way to creatively show your mastery of the concept. To create one, you can start by deciding on the characters of the comic and outlining a story that accurately represents our current understanding of the topic. Then draw the comic frames and content by hand in pencil on a series of pages. Using a black pen, ink in the lines. Each page of the graphic novel can then be photographed or scanned in good white light and brought into Photopea for editing. Any remaining pencil marks can be erased and the black lines improved, then use the Colorizing Line Art technique shown on the Software Training page to add gradients, shading, and textures to different parts of each frame. The pages can then be printed out and bound or placed into a longer multi-page desktop published document in Canva or Adobe InDesign and saved as a PDF eBook.
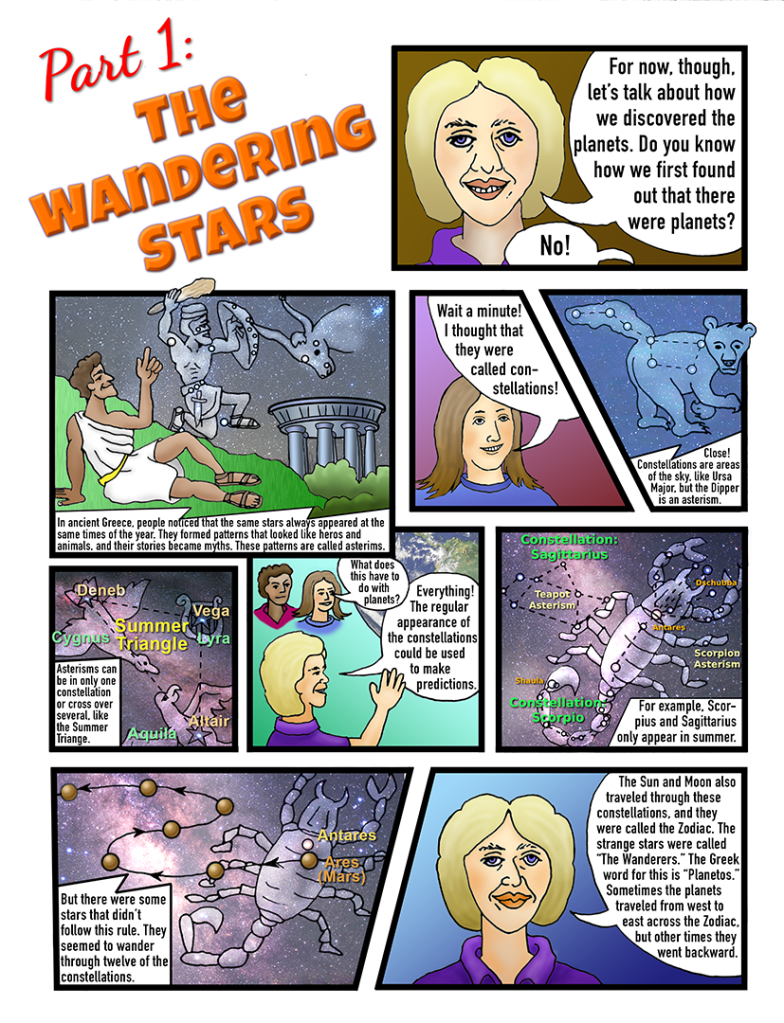
Above is an example of a poster on the chemistry of fertilizers that was created in the same way as a graphic novel. The lines were drawn by hand, then scanned into Adobe Photoshop and cleaned up, and color was added digitally along with the text.
In the example below, a student created a comic strip on radio-resistant bacteria by drawing in the frame panels and sketching the characters, scenery, and text balloons by hand, then coloring the characters with colored pencils. You can do the same hand designing but then ink the lines, photograph the pages, and add color in Photopea instead of by hand.

Collage or Scrapbook:

Some topics or concepts can be demonstrated through creating a photo collage, scrapbook, or photo gallery along with captions. This works best if the topic can be explained through a series of images, but you may need more text than a simple collage can allow, in which case you can label the images with numbers or letters and provide descriptions below the image. You can blend photos together by bringing them into Photopea one at a time onto their own layers, then use the selection tools and quick mask mode to carefully select the areas you wish to keep. Click on the layer mask icon to make the unwanted portions of each photo disappear. This technique is demonstrated in a training video here. The layers can be moved and resized to create the final collage, and by blurring the edges of the mask you can blend the photos more.
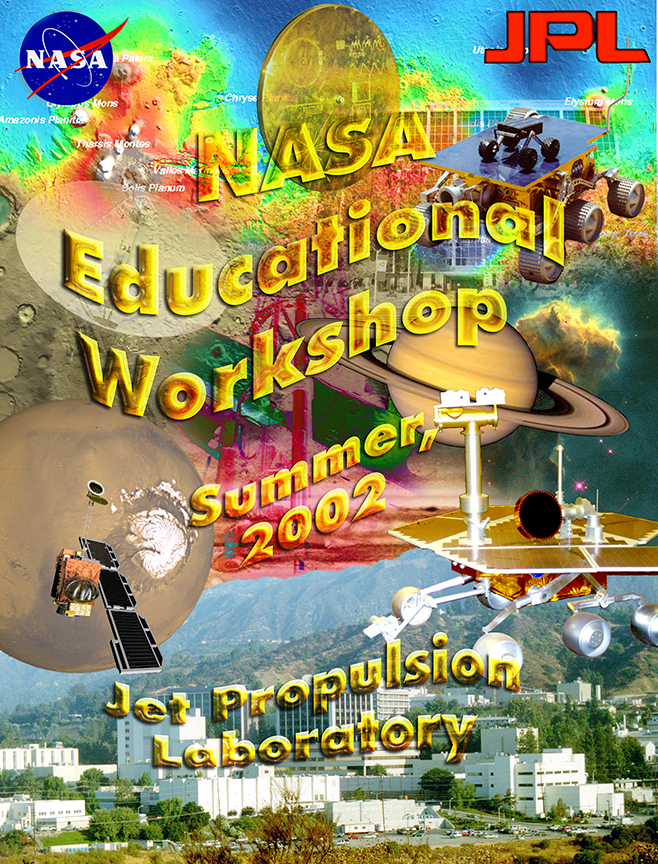
Here is another example, a collage of images from the Jet Propulsion Laboratory in Pasadena created as a cover for a binder of materials for teachers participating in the 2002 NASA Educational Workshops program. I wanted something a bit more colorful and imaginative than the standard boring binder cover. It was created using the same image compositing technique with layer masks.
Pop-Up Book or Flip Book:
Another project that makes use of photo editing and image design software such as Photopea is to make a pop-up book or flip book on a subject. These have to be carefully designed and require some thinking and planning. For a pop-up book, as the pages are opened, a scene will be pulled open that pops up as a three-dimensional paper model. You can go to a Hallmark store and look at examples. The pieces have to be designed with tabs, then printed on cardstock and cut out so that they can be glued into the final book. It should have 3-4 different scenes that tell a complete story.

In the example shown here, a student has made a pop-up book about halophilic bacteria living in the Great Salt Lake. The pop up scenes are quite basic and need better designing and other shapes, but the content was nicely written.
For a flip book, a series of images are bound together so that when flipped through rapidly, they create the appearance of motion as in a video. Excellent examples are shown in the OK Go music video “The One Moment” at: https://youtu.be/QvW61K2s0tA.
Technical Diagrams or Illustrations:
If your project topic involves a complex process or machine, a diagram, schematic, or technical illustration may be an excellent way of explaining it. Inkscape, as a vector illustration program, is ideal for such a project, but Photopea can also be a good choice. In some cases, creating a 3D model (with orthographic and isometric views) of the machine or process, then exploding the parts and labeling each can show how the parts are assembled and how they function in the whole. Think of one of those frustrating IKEA diagrams, but in your case, you want to use text instead of obscure icons. Doing something like this will take considerable skill in Photopea or Inkscape, but is also a great way of practicing the software to gain mastery.
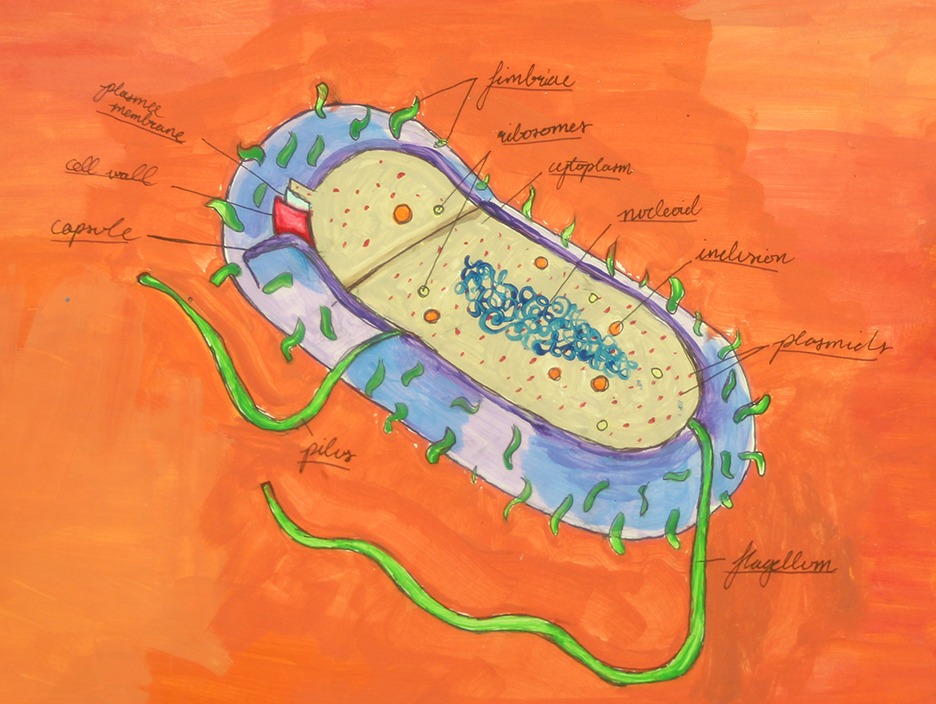
The example shown here is a physical painting instead of a digital diagram, but conveys the basic idea. Instead of just names, the labels should provide further information and go into more detail to demonstrate mastery of the parts of a bacterial cell. The labels should be done using the type tool in Photopea or Inkscape instead of being drawn by hand.
As a single illustration, it could be imported into Scratch or Wick Editor and buttons placed over each of the labeled parts so that when the label is rolled over by a mouse, additional text pops up making the illustration interactive.
Illustrated Notes or Reports:
If you are the type of student who likes to take notes and tends to doodle or decorate as you write them, and if you have good handwriting, this may be a great project idea for you. I have seen students, as I have been circulating around the room, who have amazingly intricate and artistic notes. I’ve asked the students if I can copy them and hand them out to the other students as great examples of how to take notes and to help them prepare for tests.
You could take this a step further by using your cell phone or iPad camera to photograph your teacher’s drawings on a white board or calculations working through sample problems, then clean these up in Photopea and add them to your written or typed notes. Then the whole thing can be annotated with the Type Tool and printed out or turned into a PDF for others to share or to turn in as your project. Your teacher will appreciate it!
Blog Post with Images:
If your teacher has a class blog site (such as the one you are reading right now), you can write a post on the topic of your choice to show your understanding of that concept. For example, in my Elements Unearthed blog site, I had students write blog posts about the chemical elements as Guest Authors and had them go through several rounds of editing and revision until the text was well written and informative. The students found related images and edited them in Adobe Photoshop, then I taught them how to create a new post and insert images and captions. Some of my most visited posts were written by students, such as this one on thorium reactors by Eli, one of my chemistry students: https://elementsunearthed.com/2010/10/06/thorium/
Infographics, Mood Boards, or Linked Posters:
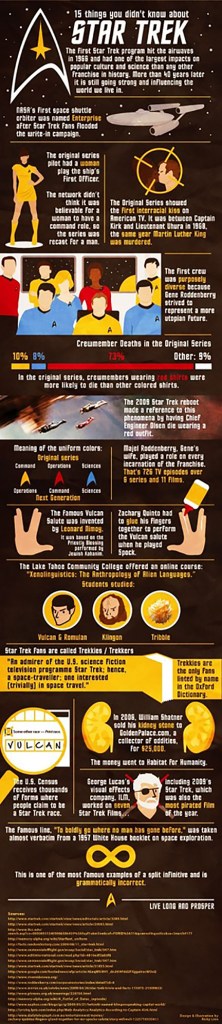
An infographic is a single-sided document that contains graphics, charts, data, text, and other design elements that use a consistent design theme, colors, and layout. They are meant to be eye-catching and to explain a concept in detail. Think of them as an extremely well-designed and visually integrated poster.
It takes some excellent design skills to think all of this through and to consider how to present different types of data in a visually consistent manner. In the Star Trek infographic shown here (this was not done by myself or a student), the colors are those used in the uniforms for the original series (TOS for you Trekkers out there) and the font is the same one developed for the series. It presents a great deal of data from the percentage of red shirt deaths to the meaning of the uniform colors.
For your own infographic, you will need to collect a considerable amount of data and decide how that data will be presented, along with graphic images, fonts, and color schemes. Then a browser-based program such as Easel.ly or Piktochart or Canva can be used to choose a template or start from a blank document. The end result can be as detailed as you want, but should balance text, data, and graphical elements and include enough negative space to prevent overcrowding. The design elements need to have a flow of information that is hierarchical and easy to follow visually. For a linked poster, URL links can be included in an online poster that take the viewer to further information. This can be done in Thinglink.
Brochures:
Using Canva as a Desktop Publishing platform, you can create a brochure using both sides of a single piece of paper (or two 8.5 x 11 inch images). The layout design and information flow are shown in the diagram to the right. When a sheet of 8.5 by 11 inch paper is folded into thirds, it provides six panels using both sides of the paper.
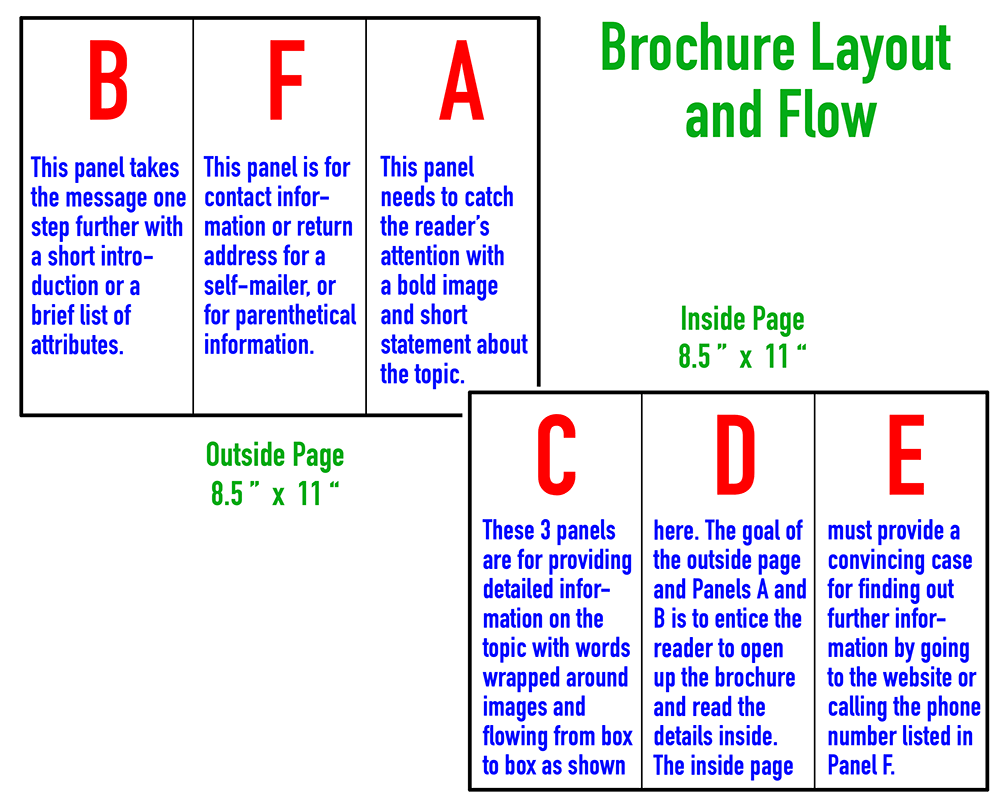
When folded up, the first panel seen is Panel A, the brochure cover or the right side panel on the first or outside page. It should include an eye-catching image and a brief title to grab a person’s attention enough that they will pick up the brochure. The next panel is labeled B and is on the left side of the first page and is what’s seen when the cover panel is opened. It should develop the idea further with a short list of attributes or reasons for buying that product or traveling to that location. Then the reader will open up the next flap and see all three of the inside panels (C, D, and E) at once. This is where the message is elaborated and details provided, with the goal of convincing the reader to explore further by going to the web address or calling the number listed in Panel F. The text should flow from panel to panel and wrap around any images. Finally, Panel F can be a place for the return address and receiver’s address and place for a stamp if this is a self-mailer or contain contact information (addresses, webpages, phone numbers, etc.) so that the reader can find out more. It can also include a Call to Action, where you explicitly ask the reader to buy the product, make that call, or take action.
The example shown below is from an assignment in an Earth Science class to pretend we are 300 years in the future and interplanetary travel has become routine. The students pick a solar system destination, such as a planet or moon or other body, and create a travel brochure that specifies that object’s interesting features (Climb the ice cliffs of Miranda! Sail on the propane lakes of Titan!), hotel accommodations, space ship features, and safety regulations. In this case, a student created a fanciful illustration of visiting Saturn. You could create your own illustrations by hand or use Photopea, ProCreate, or another painting program. Then lay out the text boxes with wrap-around inside Canva. The final version can be printed (both sides on one sheet of paper) or converted to a PDF and shared.

Newsletter or Magazine:
Using Canva or other desktop publishing software, students can write articles on a subject, create illustrations with captions, and lay out everything in a multi-page newsletter or even student-created magazine. You can add automatic page numbers, jump links, tables of contents, banner images, sidebars, and other features. A good example is the newsletter my students created on astronomy topics called Ad Astra Per Educare: To the Stars Through Education. Here is a PDF of our third edition on the nearby stars:
Illustrated Children’s Book:
You can use Canva to layout your own drawings or your illustrations from 3D modeling programs or Photopea using the Colorizing Line Art technique described in the linked video. Once the illustrations are ready, you can add text that wraps around the images to create an illustrated children’s book or story on a STEM topic of your choice. This could be printed out and bound or converted to a PDF for online sharing.
The concept is easy enough, but the hard part will be to take your advanced mastery of the topic and translate it into terms and ideas that a young child can understand. The illustrations should be simple and eye-catching, colorful and playful all at the same time. When it comes time to present this project at your school STEAM Showcase night or other event, you could hand out printed and bound copies to the children in your audience.
If trying to write for a young audience is too challenging, you could create a cartoon or joke book on your chosen topic. Imagine a book full of cartoons, limericks, jokes, and puns all about quantum mechanics as told by a stand-up comedian named Boson the Clown.
Illustrated Poem or Essay:

If you are a poet or enjoy writing essays and opinion pieces, you can create illustrations, photograph them and clean them up in Photopea, then take them into Canva or other DTP software to add your poetry or essays in a nicely formatted book. Imagine a book of poetry, or a combination of funny poems, limericks, puns, memes, and cartoons for an illustrated joke book. You can add text effects or illustrated capitals and turn it into an illuminated manuscript such as was done by monks in the Middle Ages, except you will have the best digital media tools to make your manuscript into a work of art. A great example from the Renaissance is the book Atalanta Fugiens, written by Michael Maier and published in 1618. He wrote about the 50 secrets for creating the philosophers’ stone, using arcane symbols (hand tinted in the example at right), epigrams in Latin and Old High German, and a three-part musical fugue with voices for Atalanta, Hippomenes, and the Golden Apple representing the Tria Prima of quicksilver, salt, and sulfur (the Paracelsian elements).
Now imagine if you were to do something similar about a STEM topic of interest to you, combining original essays, poetry, illustrations, and thoughts all laid out with the care of an illuminated manuscript as a digital work of art. That would certainly demonstrate your mastery of the concepts and your creativity and commitment to quality.
Board Games:
A great way to demonstrate your knowledge of a subject is to create your own review board game. It can be based on existing games or be entirely unique. Using Photopea or Inkscape, you can build the graphics for the game board and cards, then bring the designs into Canva to add text for the cards, the board, the rules, and packaging, and put together a mock up for an entire board game.
You could even use 3D modeling software to design, then print, your own game pieces. The final images for the game board can be printed out in parts, then trimmed and glued onto Foamcore or dense cardboard. You want to begin with an image that is the final size but medium resolution (150 to 200 ppi) or create a high resolution image that is proportional to the final image. That image will then be scaled up with resolution turned down to keep the file size manageable, then cut and pasted into separate printable parts that can be glued back together.
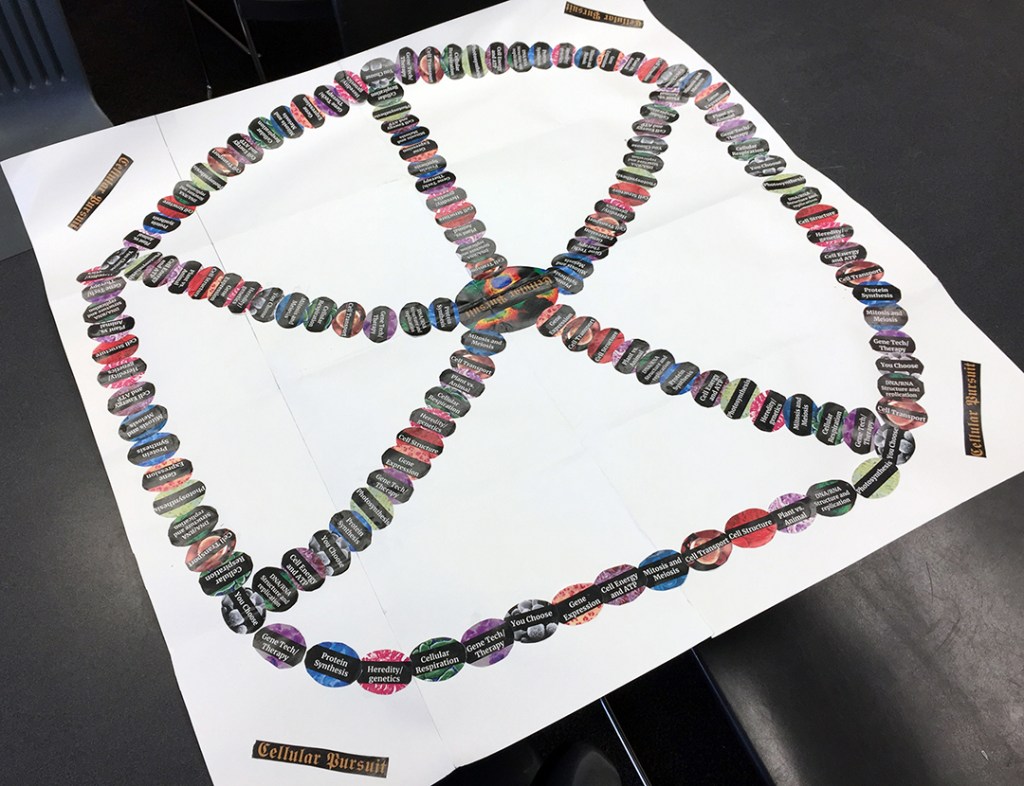
Imagine a game of Cellular Pursuit, as shown at the upper left, Geology Monopoly, or a Game of Life for chemistry careers as shown at right. For the Cellular Pursuit game, the student used Pixlr, an online pixel-based program to create all of the elliptical pieces and glued them onto a large piece of poster board. She used the same symbols to design the question cards with questions and answers for each of the six categories. Altogether she came up with 120 questions that were of AP Biology level. She certainly demonstrated her mastery of cell parts and processes!

For the Chemistry Careers game, the student combined gameplay ideas from two games including the Game of Life, but in this case the players are acting as college chemistry students collecting course cards in order to graduate from college, then get chosen for a professional career in chemistry that includes expected earnings and job requirements. She certainly demonstrated a deep understanding of chemistry careers and educational pathways!
Animated Presentations:
GoogleSlides and other programs can create excellent presentations, but we have all seen too many of these, especially the poorly designed ones. To give your presentations more interest and pizzazz (and more effectiveness as a result), Animaker and Powtoons add animated characters and other elements such as text and objects. Prezi changes the presentation into an animated concept web and allows the user to zoom in and out of different areas of the web.

You can choose from a variety of characters, with poses, backdrops, color schemes, settings, and animations for each. Text can be zoomed in or faded in and out, and transitions chosen that help to maintain the audience’s interest and focus. The presentations can be saved as video files and used as standalone presentations or sent as attachments to emails. You see here two examples of still images captured from an Animaker animated resume I created as an example. Powtoons is very similar.
Text to Speech Animation:

Voki allows you to type in text, select a character, voice, and background and have that character read your text while it mimics your face and eyes. These “talking heads” can be used in videos or presentations. Imagine William Shakespeare with a British accent reading poetry about the stars or reciting your brilliantly written essay, or Albert Einstein encouraging the exploration of space.

Voki is very simple to use – just type in the text you want. There is a limit of the number of characters it can do at one time (600), but you can create multiple scenes or takes that can be stitched together in a video editing program like WeVideo or iMovie. When you start the free version, DO NOT click on the START NOW buttons as that will trick you into installing software. Instead, just start choosing a character (there are many categories, including Greek gods like Poseidon shown here). You can change the colors of the character’s hair, eyes, lips, and skin. For some characters (not Poseidon) you can change the clothing; if not, the choices will be greyed out. You can change backgrounds, and when you are satisfied with the scene, click on the speaker icon at the bottom and start typing in your text. When you test it, if a word doesn’t come out sounding right, try spelling it phonetically. For example, it thinks Poseidon should be pronounced Pes-o-den, so try spelling it Poe-sye-don. Then choose your voice, which can be from a list of humans (adults or children) or robots. You probably want a large booming voice for Poseidon.
There are many possible uses for Voki text-to-speech animations. Although there are no plain colored backgrounds that can be used for chromakeying, some are close and could still work. Then you can have an animated narrator for your projects. A single 600 character Voki animation by itself will probably not be able to go into enough depth to demonstrate your mastery of the concept, so you will want to combine it with some other software such as part of a larger video. Or you could switch characters and voices, record different parts, and edit the clips together to create a conversation which could provide enough depth.
Cartoon Strip or Comic Book:
If drawing comic strips or graphic novels by hand isn’t your thing, StoryBoardThat and MakeBeliefsComics provide a range of characters, backdrops, props, and text effects and can do up to six frames at a time. You can change the colors of backdrops and characters, pose them in different ways, choose different expressions, and use them to tell a story or discuss a STEM concept. You can take a screen shot of the six frames, then make another six frames. The free option places a large watermark on each frame, so a screen capture is better, which can have its resolution improved and any problems fixed in Photopea.

For the example here, a backdrop was chosen and colors changed, then two characters were placed in the frame with their rotations chosen and leg and arm positions selected. Their facial expressions were picked, and speech balloons added with text. A pigeon was added to each frame for fun. The format of three frames was chosen and the process repeated for each frame. Copying and pasting from frame to frame does not seem to work, but it doesn’t take much time to build a frame. The characters here have wires for arms, legs, and necks but there are many characters and scenes to choose from, and you can build whole crowds of characters if you want. MakeBeliefsComix has fully fleshed out characters but not as many options for poses, expressions, or custom colors.
By itself, a three-frame comic strip will not be enough to cover an entire topic, so you will need to make several pages to tell a complete story. There are historical characters including Greek gods and goddesses, ancient civilizations, the Middle Ages, 1800s, and so on so it could be a great project to tell an historical story, such as about Paracelsus, Jabir Ibn Hayyan, Ramon Lull, or other alchemists or about Democritus versus Aristotle, or the tale of Humphry Davy and Michael Faraday. It would need to become a complete comic book or graphic novel.
Video Storyboard:
Another way to use StoryBoardThat or other comic strip software is for sketching out story boards for video projects. If you do not want to sketch out the actions you intend by hand, these programs can be used to do it for you. Use a video storyboard to plan out a narrative film, one with actors and scripts. The sketches are meant to frame what the camera will see, including long distance establishing shots, medium shots, and close up shots as they jump from showing one character to another. The frames can also show action by putting in arrows that demonstrate how actors will move and interact. The basics of a scene such as characters and their positions and poses can be created in the comic strip software and printed out, then other bits that aren’t available in the software can be drawn in by hand.
The example below shows a comic strip done with MakeBeliefsComix. Its characters and backgrounds are nicely drawn and more complete than those in StoryBoardThat, but there are fewer choices for customizing the characters such as posing them or changing their colors. In MakeBeliefsComix, you can add up to 18 frames and save them online. There are controls for moving, resizing, and flipping characters and a number of speech and thought balloons, text boxes, and masked characters to include COVID pandemic storylines.

3D Still Images:
There are many ways to use 3D images for you STEM projects. You can build a 3D model in programs like Tinkercad or SculptGL, then rotate it how you want and save out a still of that model or create a screen capture of it. It can then be moved into Photopea and call-out text or labels can be added to create 3D diagrams. For example, if you want to build a 3D model of a molecule such as tyrian purple you can create it as a ball and stick model in Tinkercad, changing the colors of the balls to represent different atoms such as burgundy for the larger bromine atoms. You could even look up atomic radius information and make the spheres the correct relative sizes. then you could show it from the top, front, and side orthographic views as well as a perspective or isometric view, saving a screen shot of each angle and recombining them in Photopea and add text, as shown here.

You could build the pieces of an alchemist’s laboratory or a modern high school chemistry lab and bring the image into Wick Editor or Scratch to create an interactive program to learn lab equipment, such as having text switch up in a text box when different pieces of equipment are rolled over by the mouse, such as a Florence flask or graduated cylinder.
You could use SketchUp to build the structure of a virtual museum, then fly the camera through to take renders of the interior displays from different angles. These images could be stitched together in Wick Editor to make a virtual museum program on a science topic of your choice, such as a tour of the periodic table of the elements.

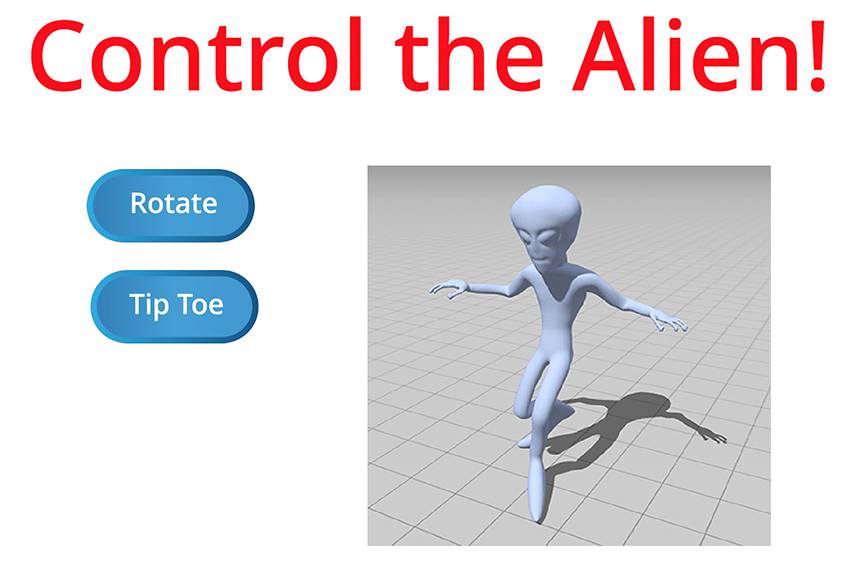
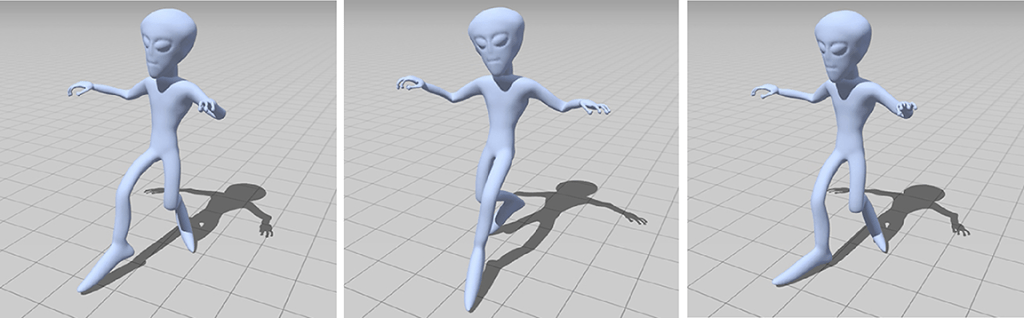
If an animation is created using the rigging and animation features of Adobe Mixamo, you could screen capture individual frames of the animation and stitch them back together in video software or align them as separate layers in Photopea, then save them out again to make separate costumes for Scratch or separate frames for a Wick Editor animation and use buttons to control it by swapping costumes of jumping to the animation frames. An example is this Scratch interface for showing animations of my favorite gray alien as shown here.
Any of these projects takes some careful thought, but the results will be well worth the effort as you learn 3D modeling skills and come to understand your STEM concept better.
3D Image Sequence:
Neither SculptGL nor Tinkercad can do animation. Clara.io could do animation, but was officially discontinued as of Dec. 31, 2022. Adobe Mixamo can rig your 3D models and apply pre-created animations, of which there are hundreds. Many of them can be useful, but for most purposes you want to create your own custom animations where you manually move the rigged characters joint by joint. About the only option available for doing that now is Blender, which is not a browser-based program and will require a fairly powerful computer to download, install, and run. At least it is free, and can do anything you want it to do including taking the auto-rigged characters you’ve designed in SculptGL and Tinkercad and importing them from Mixamo with their bones intact into Blender as FBX files which can then be animated by hand. How to do this is beyond the scope of this website and what I want to show you with my training videos; if you want to learn how, you will need to find your own tutorials, of which there are many.

If all you need is an easy sequence of images of a model moving, such as rotating or other basic actions, you can create a still model in SculptGL or Tinkercad and save as an OBJ, then import them into Adobe Photoshop with their textures and add a background scene in a background layer, such as this image of a low-poly model of a certain ex-president in front of the White House shows.
The model can then be rotated frame by frame or played through its animation and each frame saved out as separate images, then stitched together in video software or a linear animation program such as Wick Editor or switched in as separate costumes for a sprite in Scratch. Here are several frames of my gray alien saved from using precise rotations in Tinkercad:

Here are several frames saved as separate images from a Mixamo animation and played sequentially in Scratch:
Although full control of bones and rigging is the ultimate way to make custom animations, you can still create some useful effects with a sequence of still images.
3D Models – Rigging and Animation:
A 3D model is essentially a shell of polygons that have been subdivided and rotated to approximate the appearance of a real or imagined object. The more polygons a model has, the more detail it can show. To get a model to move around and change its form requires it to have a structure of bones attached, with each bone able to rotate at the joints between them just like our own skeletons are able to move around our bodies.

This skeleton of bones and joints is called a “rig” in 3D modeling and the process of building the bones, attaching them to the polygons, and assigning which polygons are influenced by which bones (the weighting of the bones) is called “rigging.” If you watch the end credits of any 3D animation or movie with extensive Computer Graphics Inserts (CGI), you will see separate teams working on the modeling, the texturing, the rigging, and the final animation or setting the keyframes for moving the rig.
Usually the rigging process is a lengthy, highly detailed, laborious process that can only be done by high-end and expensive software and by people with extensive training and experience. That is not the case any more. Using machine intelligence or AI, the people at Adobe have developed a free online tool called Mixamo. It allows you to import one of several file types such as OBJ or FBX, which contain textures, or a Zipped file that has the model and texture inside the Zipped folder together. Its main limitation is that the models have to be humanoid – standing up facing the front with arms to the side in a T-pose and hands facing down, with legs slightly apart. The model can have clothing but not props or tail, no extra arms or heads, and it helps for the model to have a distinct chin without a beard.

To make such models you can use a free program called Make Human. It has to be installed on a desktop computer, but is quite easy to use. It begins with a generic human figure which you can then customize by moving morph target sliders to make the figure male or female, pick different cloths, change is musculature, height, age, facial structure, and much more. The model can then be exported as an FBX into Mixamo for rigging and animation.
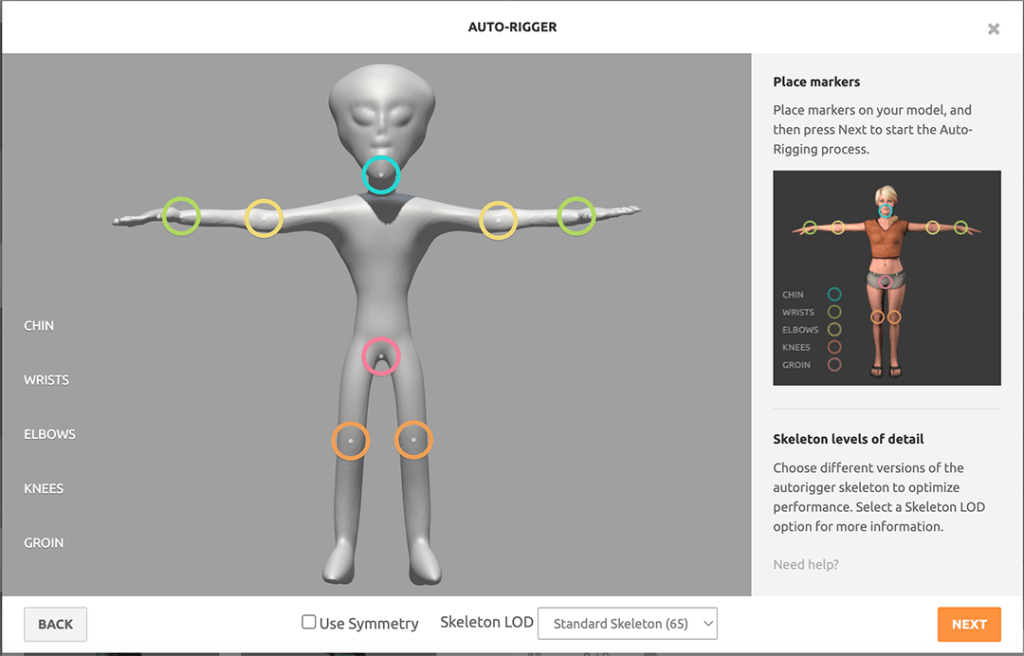
Once you have imported your model into Mixamo, you can create the rigging in a matter of a minute or two. You place markers on your model at the chin, elbows, wrists, knees, and groin and the program will automatically create a rig of 65 bones, complete with weighting and bone names. Once the process is complete, you can export the T-posed and rigged character as an FBX file and use it in 3D animation programs such as Blender or commercial software such as Maya or 3D Studio Max.
If you do not want to create the animation by hand, you can choose from hundreds of animations inside Mixamo. These presets have been created through motion capture suits and machine intelligence. Each animation can be customized for frame length, speed, and energy and exported as a separate FBX. Then a small utility program called Mixamo Character Animation Combiner allows you to import each of the FBX files and combine them together into a single file so that you can choose which animation to run given different conditions, such as triggers in Adobe Aero for Augmented Reality.
I have created videos to explain this further and to walk you through the process. They are the SculptGL second video and the 3D workflow video. They are found in the Software Training section of this website at: https://science-creativity.com/software-training. As for the section about running the models through Clara.io, that is no longer possible because the Clara.io site has now been shut down as of Dec. 31, 2022; I will upgrade the process as soon as I can figure out a workaround.

It will be up to your own imagination to decide how to incorporate the Mixamo preset animations into your own projects. You could add a touch of humor to a STEM video by making a 3D model of an Einstein or Isaac Newton or Antoine Lavoisier break dance, walk like a zombie, do the chicken dance, or dance the Macarena. You may not need all the frames of an animation; just enough for one simple action, such as walking forward or pointing to something, etc., You can create a voiceover of your STEM character talking or interacting with others. Perhaps all you need is a few still images, which can be combined with other details in Photopea to make a 3D comic book on a topic. You can model a humanoid robot in Tinkercad, export it into SculptGL for adding texture, rig it and animate it in Mixamo or have it become a character in a larger 3D animation scene in Blender. If some day you want to work at Pixar, this is a great way to start!

3D Printing for a Mini-Museum:
Another option with 3D models is to print them out with a 3D printer to create a display of your work. For example, for a unit on microbiology and diseases for your biology class, you could use SculptGL and Tinkercad to create your own models of different types of viruses, everything from rabies to ebola to bacteriophages to COVID-19. These virus models can then be printed and painted using either acrylic paint (for a matte finish) to fingernail polish (for a glossy finish). Regular Testor’s model paints don’t work as well on PLA plastic because the paint will wick into the plastic and spread out.

With the models complete, you can use Canva or Photopea to create display cards for the viruses showing photos or illustrations of the virus, its life cycle (if it is lytic or lysogenic), its symptoms and treatments, and other facts about it. Then the cards and printed models can be displayed in the classroom as a microbiology mini-museum, as shown here.
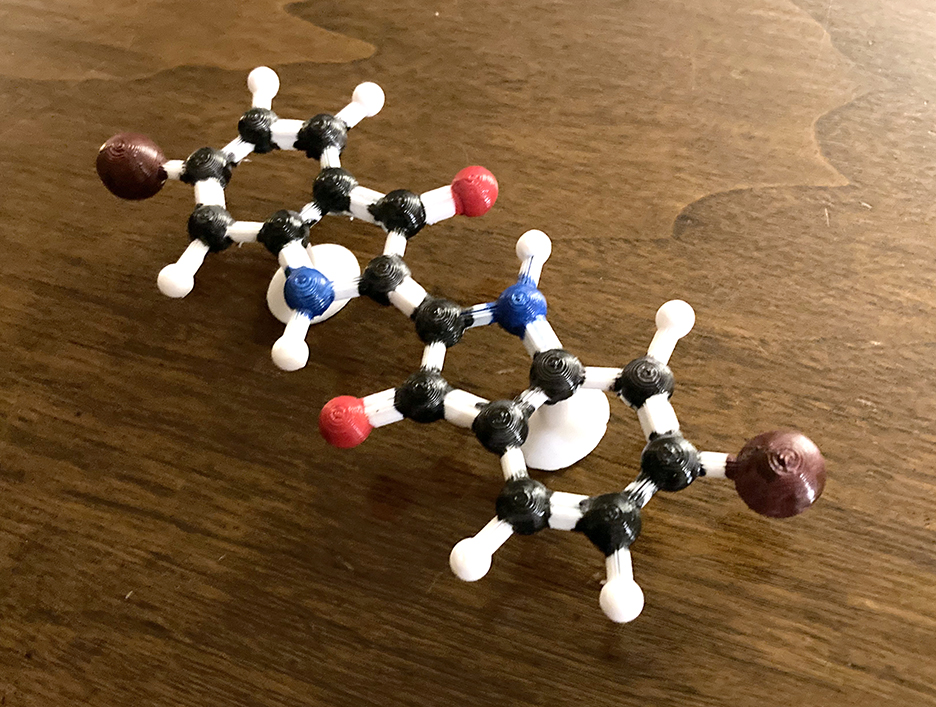
Many other types of object-based learning projects can be created. Students in a chemistry class can pick their favorite molecules, design them in Tinkercad (such as the Tyrian purple molecule shown here), add bases so they will stand up, print them out, and paint them. Students can create display cards on the molecules’ historical significance, structure, properties, and uses.
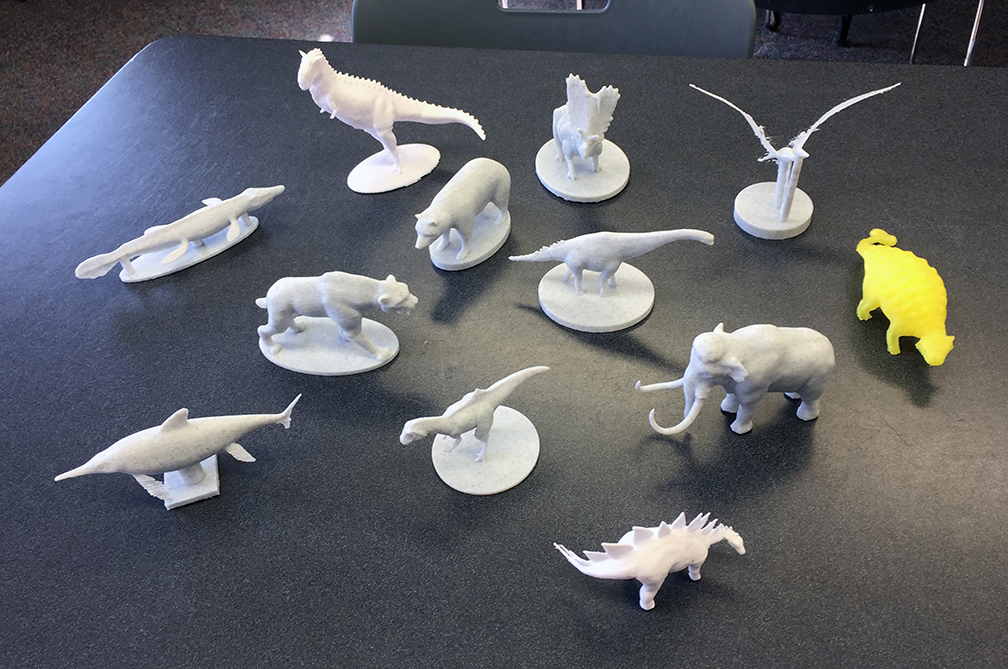
A display of extinct ancient life can be built for a unit on paleontology, with cards on their place in geological time and the habitats they lived in. A display of possible alien life or extremophiles for a unit on astrobiology, with display cards for actual exoplanets they could live on and their environments and adaptations, could be created for a section on the characteristics of life for the first unit in biology.
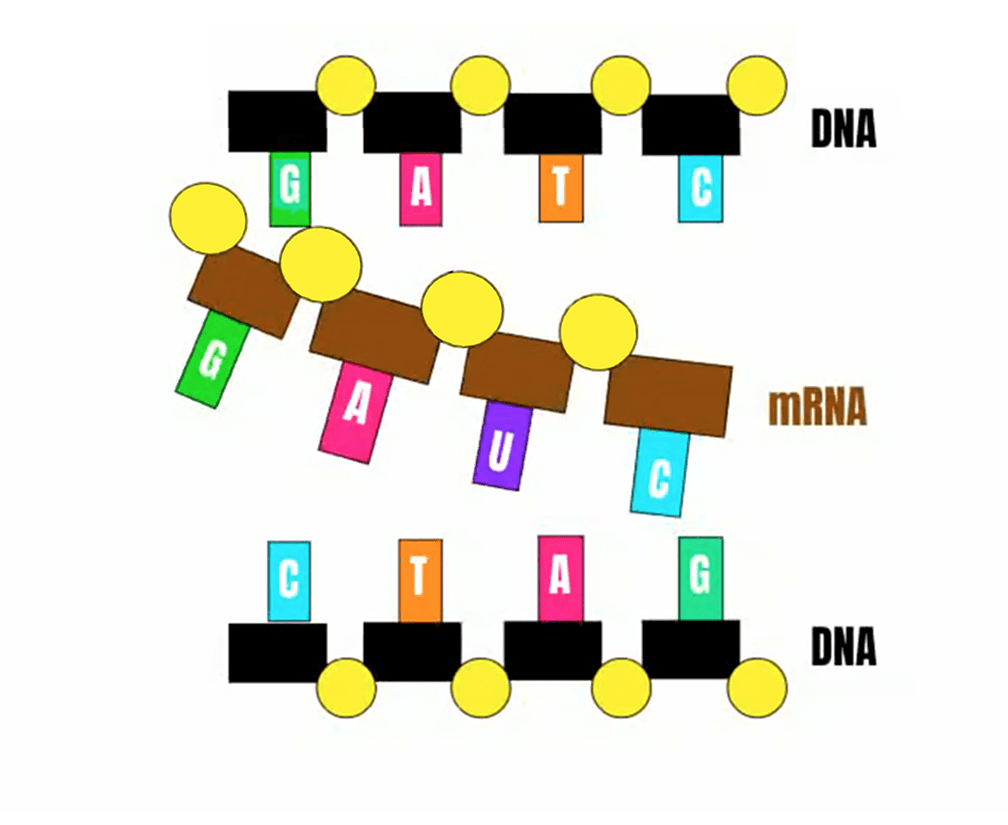
My biology students are currently building physical or virtual models of part of a DNA strand, showing at least ten base pairs and the deoxyribose/phosphate helices on each side.

One of my biology students created a model of a eukaryotic cell complete with removable organelles, built like a 3D puzzle. Physics students could design, build, print, and test simple machines combined into children’s toys or rubber band shooters, or create the parts for reaction carts, optical kit components, or other common physics demonstration equipment. With some imagination and creativity, simple 3D software and a 3D printer can be combined to create all kinds of STEM-related objects.

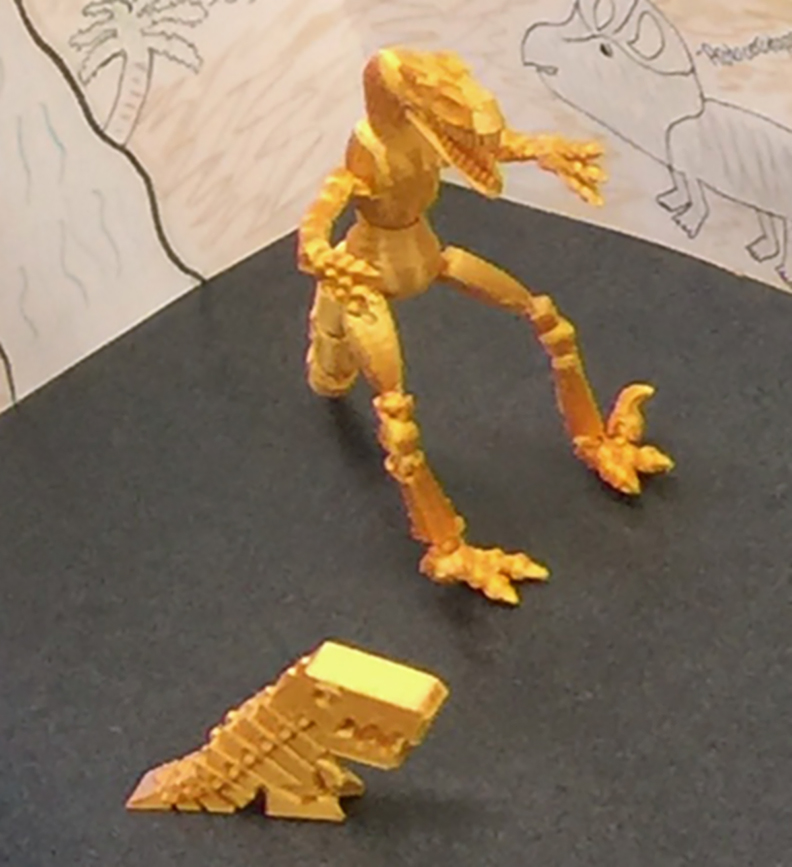
3D Prints for Puppet Shows:
Another possibility for using 3D printed models is to design them to be posable, such as the raptor model shown at right. I found it inside Tinkercad, took all the parts and laid them out in one file so that none of the parts were touching, then saved out the complete file as a single OBJ. Inside my 3D printer, I could then resize the entire file and all the parts would grow or shrink together so that they would still fit. Each part has a ball and socket shape that allows the joints to be moved and posed. You could print out several copies at the same size using different colors of plastic, then mix and match the parts.
Another model that is somewhat posable is the small Flexi-Rex shown in the photo that I found on Thingiverse. It’s tail is flexible through a series of chain links and allows for some posing.
Using such models as puppets, you can pose them and move them gradually, taking photos of each step, to create a stop-motion animation. The sequence of images can be dropped onto the timeline in a video editing program like WeVideo or into separate frames of Wick Editor or as separate costumes for Scratch.
More traditionally, a 3D model can be built with a handle or designed as a marionette and moved around with strings on a stage as a traditional puppet show. There are many possibilities.

3D Models for Augmented Reality:
Adobe has developed a desktop application as part of their Creative Cloud suite of software that can load in 3D models, even animated FBX files, and arrange them in a scene that can be played back on a cell phone using a free app. The program is called Adobe Aero, and it is designed to be easy to use without having to write any computer code.

You simply load in the files and arrange them in a scene, including layered images (Photoshop or Illustrator) that act as backdrops which can have their layers separated on the Z-axis to provide depth. Each layer is a flat image, but when moving around in the scene, the top layers will appear closer and have correct parallax. We call this 2.5D, as it is halfway between 2D and full 3D. The fully 3D objects in the scene can be moved, rotated, and do other behaviors through a simple process in the desktop application. You set different types of triggers on the objects, such as when the scene begins, or when the object is tapped, or by proximity (when your cell phone appears to get close to the object). You can string behaviors together or have them happen simultaneously. If an object, such as my gray alien, has multiple animations combined, you can choose which animation to play at which times. You can also set up pathways and have the objects move along the paths or orbit each other.

The idea, then, is that on the mobile app, you load in the scene and it asks you to scan for a flat surface, which can be a table top, the floor, or even a wall. Once the surface is found, you tap on the surface to anchor the scene and the objects will show at that position and even cast shadows. You can select an object and increase its size or rotate it around to face a particular direction. When the scene is set, you click the Play button at top and activate the triggers for the objects and they will play through their sequence of events.
This is a new way of viewing objects and the educational possibilities are just beginning to be realized. This is cutting-edge stuff, and if you learn how to model, texture, rig, animate, and program your own models and scenes in Adobe Aero or other augmented reality or virtual reality program (for example learning how to use Unity or the Unreal Engine), you will have employable skills.

Just as a fun trial of the possibilities, I visited my doctor’s office two days ago and brought up a combined animation of my gray alien dancing which I had previously programmed in the desktop application of Aero. Here are some still scenes of that dance. Now imagine how you could use this technology to visualize STEM concepts.
What if you programmed a virtual periodic table that allowed you to walk from element room to element room in a VR program? You could interact with objects and solve puzzles as you start at the bottom in the lanthanide series of rare earth elements and work your way up to hydrogen or helium. Each room requires you to solve a puzzle in order to enter, and to find out clues about the entire mystery, you must solve chemical reactions such as turning copper into silver and gold (actually the copper becomes coated with zinc then heated into brass) in the Alchemist’s Dream reaction. If someday I have the 3D modeling and programming experience, I may make such a VR program or put together a team to make it happen. It will be called Mendeleev’s Maze of Madness. Imagine building a scene in Aero for just one element room as a proof of concept.

Or imagine going to a local museum and proposing to improve their user experience by making displays more interactive and interesting. You create a series of QR codes that are placed on the sign displays in the exhibits, and when scanned, they lead to additional information on the topic, such as websites or videos or augmented reality scenes. Just to try this out, I visited our local Museum of Ancient Life at Thanksgiving Point, and in the Jurassic Room I brought in an animated T-Rex (it comes with Aero) and recorded him roaring and moving around next to the T-Rex fossils, as seen here.

Imagine if the National Air and Space Museum, which is being remodeled right now, developed QR codes that you scan and an AR version of a space probe or Neil Armstrong’s spacesuit or the Spirit of St. Louis were to pop up and rotate, with labels describing the parts as they are tapped to activate. This hand-painted exoplanet (done in SculptGL) and space probe scene is just a simple example.

Radio Drama:
Using Audacity or other audio software, you can create a wide variety of STEM related content. One possibility is to create an old-time radio broadcast, complete with over-heated announcers and background crackles. A perfect example would be the infamous broadcast by the CBS Radio Network of the Mercury Theater on the Air production of H. G. Wells’ The War of the Worlds. On the night of October 30, 1938 people in the United States were already on edge because of the recent signing of the Munich Pact that seemed to be leading inevitably to a world war. Then Orson Welles presented The War of the Worlds, updating it for American audiences and the 1930s and pitched as a fake radio broadcast written by Howard Koch and revised repeatedly even right before the live show. One of the actors, Frank Readick, listened to old broadcasts of the Hindenburg disaster in order to get just the right note of panic in his voice.

You could re-create such a broadcast, but rewrite it to cover some event or topic that really was or could lead to disaster, such as global warming, the threat of nuclear war, or mass extinctions including the Permian mass extinction or the dinosaur-killer asteroid impact or the Great Oxygenization Event. Imagine pretending you are a prokaryotic anaerobic bacterium news reporter announcing the new invading cyanobacteria and their poisonous new gas: oxygen! A War of the World, indeed! Or you could talk about the probabilities of an actual alien invasion, such as shown in far too many Hollywood movies (a very low probability given interstellar distances). With a little imagination, you could have some fun creating a similar style broadcast but on a real topic, with no fake news report this time.
Audio Podcasts:
Similar to a radio-style drama, a podcast can be dramatic or informational, a scripted narrative or documentary, or just a simple conversation or interview. Several years ago I contacted Nancy Atkinson, the producer of the 365 Days of Astronomy podcast on behalf of my astronomy students in response to a solicitation for volunteers to create podcast episodes. This was originally created for the International Year of Astronomy, and I thought it might be a fun project for my students to learn astronomy topics of their choice more thoroughly. Nancy agreed that if the quality and writing were good enough, she would put the podcasts on her show.

So my students brainstormed some topics they thought would be interesting and fun and formed teams to research, write, record, and edit the audio files. Our final topics included how stars are named, how we do SETI, and famous supposed alien encounters. The teams went through several stages of script drafts until they were accurate and polished and of the right length, then I set up a good microphone and recorded them taking turns as a team speaking through their scripts.
It always takes several takes for each paragraph, as students aren’t used to sounding like radio announcers. They come off sounding uninterested or flat, and need to punch up the excitement in their voices. When they start to edit the final takes, they are always alarmed at how nasal they sound and uncomfortable to know that this is how they sound to other people. But eventually all the takes can be edited down into a final program. We then had to provide a transcript (our original scripts had to be edited to match the actual recordings) and send the files to Nancy to be uploaded, along with our one paragraph description of the topic and a biography.

Even if your students are not on a professional-level podcast, they can still create their own in-class version and even post it online using podcasting software. Imagine having small teams create their own podcast episodes on a range of current event topics in STEM fields, with one team responsible for each major topic over several units so that a new episode can be posted online once per week or so. It could be an ongoing project during the year, or all be created during a single project time period and posted staggered out over an entire year. We did something similar with our Ad Astra Per Educare newsletter; the students in one summer astrobiology class contributed most of the articles in several topics, then they were gradually being mined for different editions of the newsletter over several years.
If you want to listen to the Naming Stars podcast episode, here is the link: https://cosmoquest.org/x/365daysofastronomy/2011/12/02/december-2nd-naming-stars/ .
Original Song:
One way to show your knowledge and understanding of a concept is to write your own original lyrics to a song, either to an existing melody or to compose one of your own. There are a number of free music creation software packages or audio programs that allow you to plug in a MIDI keyboard or other instrument, then play back your tune. You could also play the music on a traditional instrument and record it with microphones to Audacity or other audio editing software.
Audacity is not browser-based, it requires installation but it is free and open-source, so that it continuously improves. It includes a number of professional quality tools for denoising (or removing background hiss such as ventilation or air conditioning sounds) and other filters. Clips can be cut and moved, have their amplitude or loudness increased or decreased to notch out a bad sound, add special effects such as reverb or resonance, and layer multiple tracks so that different instruments and voices can be overlaid and mixed.
But you don’t have to go all out professional here. Sometimes just finding a karaoke or instrumental version of a song and adding your own lyrics is good enough as long as your song is creative and conceptually accurate. In one of my biology classes a group of students took this idea to an incredible extreme, creating a complete musical theater production with original lyrics to ten songs, a script, props, programs, and posters for their big performance of “Cell, yeah!” about the parts and processes of a cell. They then acted it out to the other biology students. They truly demonstrated mastery of cell processes and parts in a fun and memorable way.
I have created lyrics to a song (but am still trying to come up with music) for a song about quantum mechanics as sung by my own cartoon character, Boson the Clown, as part of his stand-up comedy routine. It’s the sad tale of two ill-fated leptons from opposite sides of the Periodic Table. I call it: “Annihilatin’ Love”:

She was just an electron from Zinc,
His sulfur atom made quite a stink.
When she gazed in his eyes,
Orbitals hybridized;
She was no longer able to think.
“Come with me!” he said soft in her ear,
“We’ll bond with each other, my dear!
And then we will fly on
Our own little ion.
My waves interfere when you’re near!”
So she leapt to his atom with joy,
But she should have checked out this bad boy.
He was mad as a hatter,
Made from antimatter.
One touch and their love will destroy!

And the end of this very short date,
Was to mutually annihilate.
They went up in a puff
Of some very strange stuff;
Blew their love to an excited state.
So the moral of our story is this:
When electrons and positrons kiss,
Some things aren’t meant to be
Speaking atomically;
E M C squared can’t be missed.
Still Image Sequence:

Using video editing software such as iMovie or WeVideo, you can create a digital flip book made up of a sequence of still images with slight variations from image to image, each imported in and placed on the timeline with one image per frame. With the video software, titles, narration, music, and other features can be added that a physical flip book can’t have. The timing of each image (how many frames per image and therefore images per second) can be adjusted, even between one image and another, to get the timing just right. Think of the famous “bullet time” effect used in The Matrix to stitch frames from 120 cameras spaced around the character of Neo as he dodges bullets.
With some careful thought and even more careful editing, different sequences of images can be imported into different parts of the same frame to “clone” characters or create a twin effect. You might want to draw inspiration by studying practical effects techniques used in Hollywood before the advent of computer animation.
Public Service Announcement (PSA):

One way to draw attention to an issue or concept is to create a 30-second public service announcement or PSA in the format of a TV commercial geared toward public education. It could be about any topic in STEM, including STEM education itself. Several years ago I was involved in a project to create a series of PSAs to promote STEM education in Utah which featured a number of high profile university students including that year’s Miss Utah, Kara Arnold, who was a chemistry and pre-med major at the University of Utah. My part was to edit the footage from her video interviews into a 30-second format and add titles, animations, transitions, statistics, and special effects. At a Utah Science Teaching Association awards banquet, Kara was the keynote speaker and I showed the finished video as part of her presentation.

Think of a STEM topic that the public needs to become better aware of. It could be the use of public transportation, reducing pollution, proper recycling techniques and awareness (such as making sure to wash out all cans or plastic bottles before recycling), using green energy, climate change, hazardous chemicals, earthquake awareness and safety, and so many more topics. Two years ago, I had a class for students to learn media design software and the students decided for a class project to interview people on the street about their awareness of climate change issues in Utah. We got permission from a local convenience store and gas station to interview customers leaving the store and had them sign consent forms, then answer questions. Some people were very aware of climate and ecological issues, such as drought and the vanishing Great Salt Lake, overpopulation, wildfire safety, and so on whereas others were woefully ignorant. Our conclusion was that science teachers need to do a better job at educating students about the world around them. We included student narration and images and video clips that related to the questions and the final presentation was quite good.

A good example of a PSA is a “mockumentary” done about the life cycle of the average plastic grocery bag called “The Majestic Plastic Bag.” Cameras followed bags blowing across the Los Angeles Basin during their final migration to the sea to join the Great Pacific Garbage Patch (which was the real topic of the video). It was instrumental in persuading Californians to pass laws banning single use plastic bags. Check it out here:
Documentary Video:
A PSA or Public Service Announcement is like a short-from documentary, but you can create longer format videos where you interview people; include narration; show statistics with charts, graphs, and other visuals; add captions and text; and utilize all of the multimedia capabilities and literacies of video as a medium.

Documentaries have a different planning process than a narrative or acted video; instead of being completely scripted, you can never know exactly what the subject of an interview will say. You can, however, prepare by researching the topic so that you can ask the right kinds of questions and thereby anticipate likely answers and a general structure or flow of information. Once you have identified experts (or “persons on the street”), it is a good idea (and polite) to send or show the questions to them in advance so that they can collect their thoughts and think through their responses.
During the interview the quality of your microphones and audio is every bit as important as the quality of the video. Microphones do not have the ability to ignore extraneous sounds; they will pick up everything, especially if the pick-up pattern of the microphone is omnidirectional. A cardioid or super-cardioid (shotgun) microphone is better, and a lavalier or lapel microphone system with radio transmitter and receiver is better still. If outdoors, pay attention to the wind as even a small amount of breeze will ruin your audio quality with a standard microphone. A zeppelin, or wind sock, on your microphone can help but not eliminate all wind noise. For video, make sure the subject is framed correctly at one of the intersecting third lines (the Rule of Thirds) and is not standing with the sun behind them or something unsightly. You don’t want a sign post or a tree sticking out of their head!
Once the interviews are complete, you will need to transcribe them in order to determine how to edit them. There are some automatic transcription programs available. You can then go through the transcript and decide what parts go where, being careful not to change the meaning or intent of your subjects. Then you will need to write and record narration to fill in the gaps of your topic.

Then comes B-roll footage: video clips, photos, animations, captions, and so on that can be used instead of focusing on a talking head for your entire video. Pacing needs to be considered, and it is a good idea once you have a rough cut to show it to an audience to get their feedback and watch them view the program; if there are parts where they lose interest, you can note them and cut them down. The final cut of the project can then be loaded up to YouTube, shown to your class, or otherwise distributed.

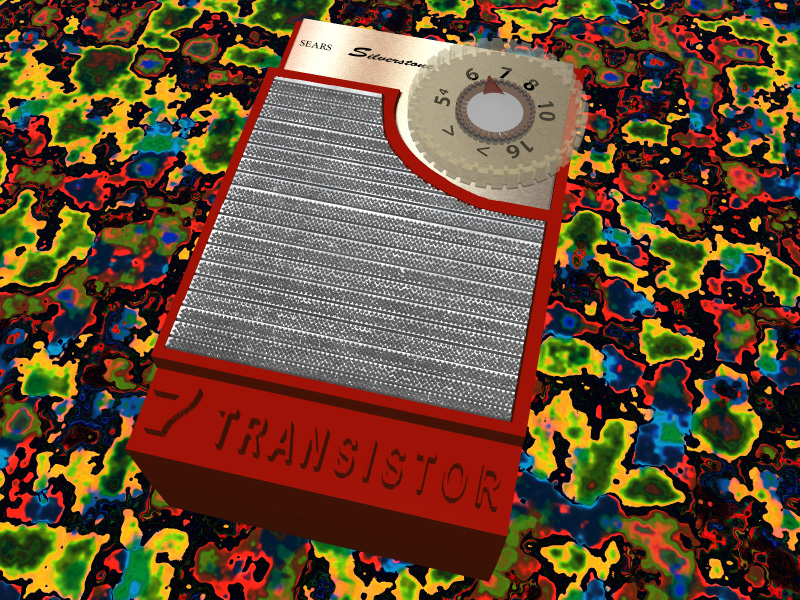
As an example, my high school media design students in the fall of 2004 were approached by a local media producer about creating a documentary on the history of AM radio in Utah. It sounded like a fun project, so we dove in head first. With a little bit of training from some college media students, we set up a reunion dinner for all of the disc jockeys we could find from the 1950s through 1980s at Utah’s AM stations. Over the course of our first year, we interviewed 25 different DJs, some in panel discussions and some individually, then transcribed hours of footage.

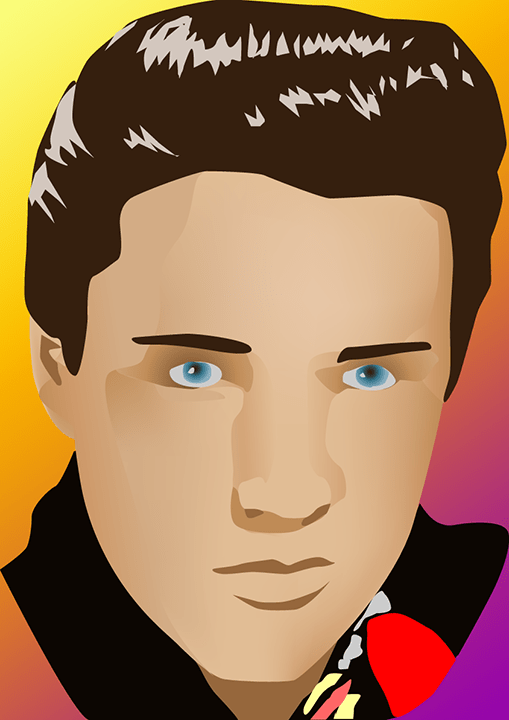
During the summer of 2005 I went through all the transcriptions and coded them for different topics, and the second year my students formed teams and edited the footage into 20 different topical segments such as how the DJs got started in radio, what kinds of concerts they sponsored, marketing schemes and events, and their favorite memories of the music and bands. Students created 3D animations of transistor radios, radio waves, radio stations, etc.; found photos online, brought to the dinners by the DJs, and at the Utah State Historical Society; and designed images such as vector illustrations of musicians and famous DJs. They edited all of this into their segments.

During the summer of 2006 we had a rough cut of the program at about 2 hours and 20 minutes. We needed to cut it to 1:56 for the PBS station we were working with (KUED in Salt Lake City) so I held several audience tests to get feedback. I observed the audience as they watched the video and saw the places where people were losing interest, then went in and cut those parts down. During the fall of 2006 we were in final production, making a final edit, polishing up the rough spots, taking the video through closed captioning, transferring it to the correct tape format, and presenting the final version to KUED.
The program, titled “AM to FM: Three Decades of Radio in Utah” aired in January 2007 to excellent reviews. That spring we mastered the audio with help from an audio expert at Utah Valley University and my students designed the case, booklet inserts, and the timeline tracks for a final DVD to sell, along with a website to market it. We had the DVD duplicated and sold it through the website, giving free copies to all the DJs that participated, and selling enough copies to cover all expenses.

During this third year as I was working on the final master, my students designed an interactive program using Macromedia Director that told the story of our project and the history of Utah radio, including 3D modeled interfaces, music clips, video clips, and even a virtual arcade game room with student-designed games. We had intended to include all of this as a playable CD-ROM, but in the end the material was too big to fit on one CD. The students did an amazing job, and some of their work is shown here.
This little project took three years but in the end is something I am very proud of. We preserved a priceless and compelling part of Utah’s history, including recording some of the last interviews ever done by several of the DJs who have since passed on to that big radio station in the sky. We gave copies of all our original files and tapes to the Utah State Historical Society.
But the project didn’t end there; after the program aired we had several DJs come out of the woodwork and ask to be interviewed, including the program manager of Utah’s main rock and roll station in the 1970s. I hope to create a new Director’s Cut version by 2027 for the 20th Anniversary of the program that incorporates these additional interviews and place each of the segments on YouTube, along with transcriptions of footage that couldn’t be used in the final cut because of people talking over each other or other problems. Many of the students who participated over three years went on to carriers in media design and video production; they certainly learned the skills needed for advanced project management.

Oh – and these Huggies, please!”
Narrative Film:
Another type of film project for you to consider is to create a narrative or fictitious film, where you write a script and have other students act out the script. Since you have total control over what is said and done in the film, this type of project benefits from careful planning.
First, a narrative film usually follows a three-act structure similar to a theatrical play. In the first act, the characters are introduced along with the conflict or problem that the characters must understand or solve during the film. During the second act, the problem or conflict becomes paramount as the characters encounter increasing difficulties and rising tension, ending with a climax. The third act is the “cool down” phase where tension is resolved, the problem is solved, the characters learn lessons, and the plot reaches a denouement where the various strands and themes of the film are woven back together and life goes on, even if it isn’t exactly happily ever after.
Interesting, compelling characters are essential for a narrative film. The audience must relate to their challenges even in a comedy. The plot should hold the audience’s attention, be believable (even in the science fiction or fantasy genres), and include some surprises. Writing the script is therefore one of the most challenging parts of creating a narrative film and cannot be shortcut.
The next stage of planning requires an eye for locations and settings. You will need to scout places to film that fit the storyline, with camera angles and lighting to match the mood you want the film to portray. Once you know the locations, you will need to plan out the camera angles and movements to support the story. For example, when a new location is shown, the camera usually starts with a long shot to establish the location, then a medium shot to show the characters in that location, then as the scene develops, the camera can show close-ups of the actors, cutting from one to another as a conversation develops. The Rule of Thirds is important for blocking out what the cameras will do: if you divide the screen into thirds both horizontally and vertically, with the screen divided into nine equal sections, then the characters should have their faces (and their eyes if you’re close in) at the intersection of the lines and looking into the frame.
All of this planning results in a storyboard, which is a shot by shot sketch of what the camera will see, how characters will move (including the camera), what they will be saying, and how long the shot will take. You can use StoryBoardThat or MakeBeliefsComix for this, or sketch it out by hand or in Photopea or Photoshop. Most students do not spend enough time planning or storyboarding; they want to jump right in to filming and then wind up having a mess of footage with no clear plan for how to fit everything together visually. Remember that the visual aspects of the story and how the camera shots are sequenced is just as important as the script and acting for telling a story.
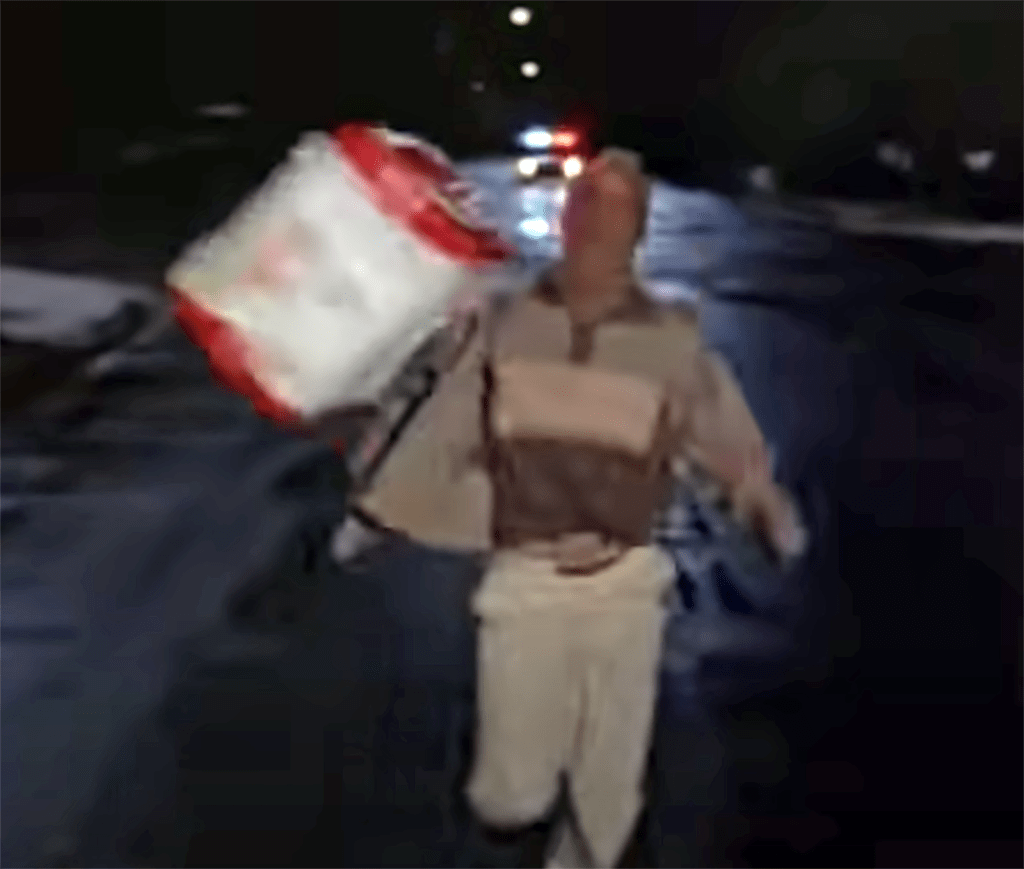
Think of an action movie sequence and how quickly shots cut from one viewpoint to another. One of the best (and most hilarious) examples I have seen is the Huggies chase sequence in the movie Raising Arizona. There is very little dialogue; the story is told by cutting from shot to shot as Nicholas Cage’s character H. I. McDonnough is trying to get away with a package of stolen Huggies. The Coen brothers took 3 1/2 months to write the screenplay and completed detailed storyboards before filming the movie over ten days. If you take the time to do the proper planning, the filming and editing will go much more smoothly.
Vodcasts or Video Blogs:
A vodcast or video blog is done in the same way as an audio blog (see above) but includes video and is posted on a video streaming site such as Vimeo or YouTube. All of the same requirements for high-quality microphones and audio recording are still essential here, because the guests’ voices are still the focus, but you also need to have good quality video and lighting.
In a standard set-up there will need to be two or even three cameras. One will show the entire scene with both the host and guest at a table or in a studio setting. The second will focus on the host, the third on the guest. The audio will need to be carefully matched up to the video as it cuts back and forth between the cameras.
It is not as easy as one might think. As in an audio podcast, having interesting topics, animated and enthusiastic guests, thoughtful questions from a host that allows the guest room to talk and who knows how to listen, and good editing can tell a compelling story.
I watched an amazing example yesterday of an interview of Rick Davis, NASA’s Assistant Director for Science and Exploration, by Fraser Cain on the subject of how a realistic human expedition to Mars will play out. In this case the interview was over Zoom, but the audio quality was excellent and the subject fascinating. Fraser Cain had done his homework; as Rick Davis said, he was spot on with his questions. You can check it out at: https://youtu.be/tujL0xrQ2Os.
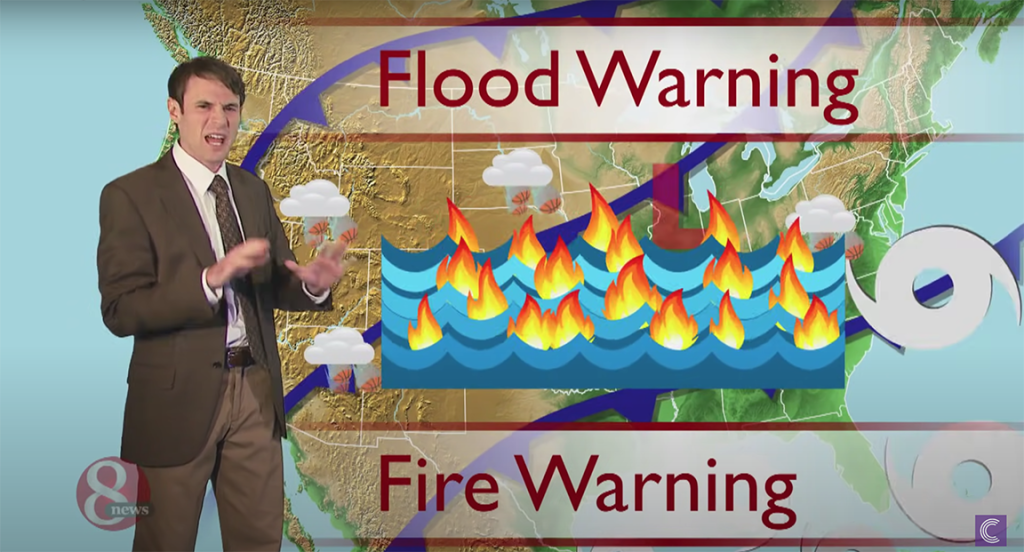
Network News Broadcast:
In the same vein as a Public Service Announcement, a group of students could do a nightly news bulletin with Breaking News, headlines, special reports, person on the street interviews, remote locations, even weather and sports reports. With some imagination and creativity, you could create a news broadcast on any STEM subject of your choice.

For example, you could do a complete news broadcast on the effects of climate change with eyewitness accounts of disasters, expert interviews, weather reports of storms, droughts, and other climate phenomena, a sports announcer following a football game with a tornado coming, etc. It can be done with humor and a bit of satire but also present important facts and research about the effects of climate change.
Or imagine a news report on future cloning research, or the consequences of a genetically engineered society, or on a future disaster in the Ring of Fire, or on a future generational spacecraft traveling to Alpha Centauri. All it requires is imagining yourself in that place and time and what would be newsworthy events or stories for a news broadcast. You would want to research current events and extrapolate to a future time when these developments have advanced to practicality.
Stop-Motion Animation:

Another method for doing animation with still images and video software is to create a stop-motion animation. You will want to plan this out just as carefully as any other video project to know what pieces or puppets you will need, then create a frame or some other bracket to hold your camera still as you take photos of a stage area made out of butcher or poster paper. Having your camera in final position and zoom, sketch out the borders of the staging area just outside the visible edges seen by the camera so that you know when objects start to become visible.
Then it is all about moving the objects small amounts between frames, usually only a centimeter or so at a time, and making sure all fingers and hands are clear before taking a photo. It will usually take at least two people, one to snap the photos and one or more to move the objects. Labels can be moved in or words can spell themselves, parts can move around, and one image can be prolonged to “pause” the animation. It is essential to get all of the photos in one session or to be very careful about camera alignment and view between sessions.

Once all the images are taken, they can be loaded into a video editing program with a setting such as one image for every one or two frames. In standard HD video, the frame rate is 30 frames per second, so using two frames per image will allow about 15 frames per second, which is about right for stop motion. At that speed, people will see the slight choppiness of the frames but it will still be smooth enough without having to take thousands of photos. As it is, a one-minute long video would require 900 photos at 15 frames per second. Once the photos are on the timeline, you can add caption text, music, or other features to the video.

There are many possible topics that you can explain with stop motion animations. My students have used them to show the steps in cell mitosis, using candy for the moving parts, or have used beads to show the steps in a nuclear fission chain reaction. You could have circles cut out of colored construction paper and labeled with a Sharpie pen for different atoms, then show the Law of Conservation of Matter in a balanced chemical reaction, or demonstrate the different types of chemical reactions or the idea of limiting reactants. You can print out 3D models with posable joints and use them as puppets, posing them for each frame of the animation to tell many types of stories.
Wick Editor Linear Image Sequence:
Wick Editor is a linear animation program similar to Adobe Flash before it became Adobe Animate. The simplest way to make an animation is to create a sequence of images that change slightly between them and place each image into an individual frame of the animation. This could be separate photos of a stop-motion animation, or 3D objects rotated in Adobe Photoshop with a background, such as the image of four frames of an exoplanet rotation shown here. In this case, the object was imported to Photoshop with a space background on a lower layer and each frame was saved out as an image separately as the exoplanet model was rotated between frames.

These frames can be imported to the library of Wick Editor. Knowing the size of each image (they all need to be the exact same size), you can go into the settings (the gear in the upper right corner) and resize your canvas to exactly fit the image size. Then the plus symbol can be clicked in the library assets window and the images all selected and imported at once.
To place the images onto individual frames, simply click on the image in the library list and a blue bar will appear at the top of the Inspector window saying “Add to canvas.” Click on that and the image will appear in that frame centered in the canvas, which should be the same size as the image.
Then it is just a matter of clicking on the next frame, then clicking on the next image in the library and adding it to the canvas, and so on. You can click on the play button at any time and adjust the frames per second in the settings window. Once all frames have been filled in order, you can add other features such as pausing the playback, adding buttons or text in an upper layer, and jumping to other parts of the program. In this way you can have linear animations and interactivity with branching in the same program. The image sequence can also be turned into a film loop or film clip inside Wick Editor and programmed to play on command.
There are many possibilities for how to use sequential images for Wick Editor animations. Although it cannot import or play video files, it can save linear animations out as .mp4 video files, or animated .gif sequences, or as .html documents to play inside of a web browser. Imagine using this to rotate an object by clicking on a button in the interface. You could do a 360° spin around a Martian space probe or the James Webb Space Telescope or an exoplanet. You could show a continuously rotating planet such as Mars or Mercury based on real photographs. You could use this to demonstrate 3D objects or products, or show anything moving over time linearly or interactively.
Wick Editor Tweened Animations:
Wick Editor is basically a linear animation program based on frames. You can create an animation by putting separate images in each frame, either by importing them as described above, or you can draw a shape or character frame by frame, making slight changes just as it was done in the old days by Disney and Looney Tunes.

But you don’t have to make it so hard on yourself. Wick Editor can do tweening, which means you create a starting position, size, and rotation for an object, then stretch out the frames and create a tween and specify the ending position, rotation, and size in the final frame. The program will then fill in all the in-between frames, or the tweens.
As shown on the right, I used the paintbrush tool in Wick Editor to create different shapes (on separate layers) of the continents during the time of Pangaea about the start of the Triassic Period and then stretched out the frames for each continent and moved, resized, rotated, and redrew the continents to get them to look like they appeared during the Jurassic, the Cretaceous, the early Cenozoic, and now. They are not exactly precise – this program isn’t quite as sophisticated for doing shape tweens as Flash was, but with careful planning you can add layers and end layers to reshape the continents. I added changes in the text at regular intervals, and the whole animation was exported as a Quicktime .mp4 file. It certainly shows the basics of continental drift from the breakup of Pangaea until now.
There are many topics you can show through animations. Imagine planning out a sequence of simple machines for a Rube Goldberg device and using Wick Editor to show an animation of how the devices will work for a ball rolling through. Imagine using Wick Editor to animate a nuclear chain reaction, or a chemical reaction where atom balls reform into different molecules for a chemical reaction. Anything that is a process or series of steps can be animated.
Informative Web Page:
In addition to frame-based and tweened animations, Wick Editor also allows for interactivity with button rollover effects and the ability to pause playback on a frame, then when a button is clicked, jump to a different frame anywhere in the timeline. By being able to create buttons and jump around the timeline, the program becomes interactive and behaves very much like a web page. In fact, Wick Editor allows you to save the program as an HTML file, which will then load up in your chosen web browser and play just like a website. It is a much easier way to create a complete website than using direct HTML programming or a compiler such as Adobe Dreamweaver.

Imagine the possibilities. Anything you might want to describe with a home page or main menu, links to different pages, back links, animations, text, images, and even some game play can be programmed first in Wick Editor, then exported as a fully-functioning HTML file. About the only thing Wick Editor cannot do (at least as far as I know) is to load up and play video clips; but since sequential images can be loaded in separate frames, it can play just like a video clip but with more control.
What could you use this for? Almost anything! If you want to describe the design, instruments, launch, pathway, and discoveries so far of the James Webb Space Telescope for an Earth Science class, this would work well. If you wanted to show examples and patterns for balancing the five different types of reactions, you could do it here interactively and with animations for each section controlled by buttons (just go to the frames where the animation exists and play forward, then pause). You could create an explanation of the six (or is it four or eight?) types of simple machines, with animations of how they provide mechanical advantages. You could show an interactive geological time program, with sample fossils popping up information. You could create an interactive diagram of a Mars rover, where rolling over parts of the diagram cause that part to light up and information pop up in a text box. Some planning and image creation in Photopea will be needed, but it certainly can be done.
Wick Editor Quiz or Game:
Beyond simply pausing the playback head or jumping to other frames, Wick Editor has more sophisticated coding for doing games or quizzes, including creating random number generators, storing information in variables, creating loops and if-then statements, and other code structures that allow for game playing or quiz design.
A great way to show your mastery of a STEM concept is to create a quiz for your fellow students. They can learn as they take the quiz, which can randomly select questions, allow for users to click on buttons which will place numbers into variables and then compare for the correct answer using if-then statements and adding to a score variable. Likewise, the program can read keyboard commands such as arrow keys or the space bar to move an object around the canvas, test if objects are touching, and change the score variable.
Since Wick Editor is based on JavaScript, about anything you can do in JavaScript you can do in Wick Editor. My training videos only show the basics; you might need to find more advanced tutorials depending on what you want to do, or get on the Wick forum and ask for help. But compared to most programming environments, Wick Editor is quite easy as the codes are arranged by categories and only need to be clicked on to add themselves to the script, with some tweaking to get the frame numbers and other parameters right.
Creating a review quiz is an obvious way to show your mastery of STEM concepts, but there are ways to create games that also demonstrate concepts for your classes. For example, imagine building a game that allows you to move objects to create a chemical reaction or play a slot machine to type in the correct formulas, or to control the path and destiny of characters using the arrow keys as they wander through the periodic table, or to build a molecule, or anything you can imagine.
Simulation in Wick Editor:

Along the lines of a game or quiz or other interactive program, Wick Editor can also be used for creating simulations or other teaching aids. It is possible to create a editable text box in Wick Editor that enters a number of the user’s choice (input) into a variable and then do calculations with it, changing how objects behave on the canvas. There are also built-in assets, available by clicking on the + button in the library, such as slider controls, arrow controls, checkboxes, URL links, and others that can help with game controlling, programming, and simulations.
Imagine creating a simulation of gravity for an exoplanet where the user could enter the mass of the planet, the mass of the spaceship (or the person), and the orbital distance and/or radius of the planet, then use Newton’s Law of Universal Gravitation to calculate the resulting force of weight.
It would be possible to change how objects on the canvas move based on user input into editable text boxes or sliders – such as having a spaceship image change its orbital distance or period based on user input for a simulation on Kepler’s laws of motion, or calculating an exoplanet’s mass and period based on the parameters of the Doppler shifting of its parent star, or create a conversion triangle for converting grams into moles for a chemical compound, or for calculating stoichiometry based on user input for chemical reaction components and initial grams.
The programming would be challenging, as would the background interface and object designs for the simulation’s canvas, but with the ability to control variables, if-then statements, frame loops and video clips, and keyboard or arrow controls, you can design anything that you can imagine if you plan it out carefully enough.
Wick Editor has a number of video tutorials created by Luca, one of the co-creators, but they only cover the basics. There is the online forum where you can check for previous questions and answers, but making the leap from the basics to complete scripting/programming control is a rather steep learning curve. This is where I hope my training videos can fill in, such as my Wick Editor video 3 on simple game programming.
One example is at left: the script for moving an object or clip using the arrow keys. Remember that Javascript is the computer language behind Wick Editor, so the scripting here uses the syntax of curly brackets to indicate the start and end of certain commands. Here, a variable is created (declared) using the var command called “speed” and set equal to 7 all in one line of code, with the semicolon indicating the code line is complete.
The if command specifies some condition to test, in this case if a certain key is pressed down. Which key? The left (you have to tell it), then tell it what to do if the condition is true inside the curly brackets, as in:
if(isKeyDown(‘left’)) {
this.x – = speed;
}
To put this into English syntax, it is saying: if the left key is pressed down, then the set the horizontal (or x) position of this object equal to the negative of the variable named “speed.” In still other words, if you press the left arrow, the object will move the number of the “speed” variable to the left. You can speed up the movement by putting different initial values into the variable “speed” that you already declared. The different parts of the coding grammar, or syntax, are color-coded with variables and commands white, events red, and so on. You can also see that different common types of commands are listed under the color blocks at the left of the code editor window, but these are not exhaustive – this program can handle everything Javascripting can do.
It takes some practice. Start small, try out a few things, look for examples you can decompile, watch the videos I’ve made, and you will gradually learn. The best thing is to set yourself a small challenge and build it, such as getting points to go up if the happy face touches the black box, gradually moving up to harder projects. This is a great environment for you to start learning computer programming.
Linear Animation in Scratch:
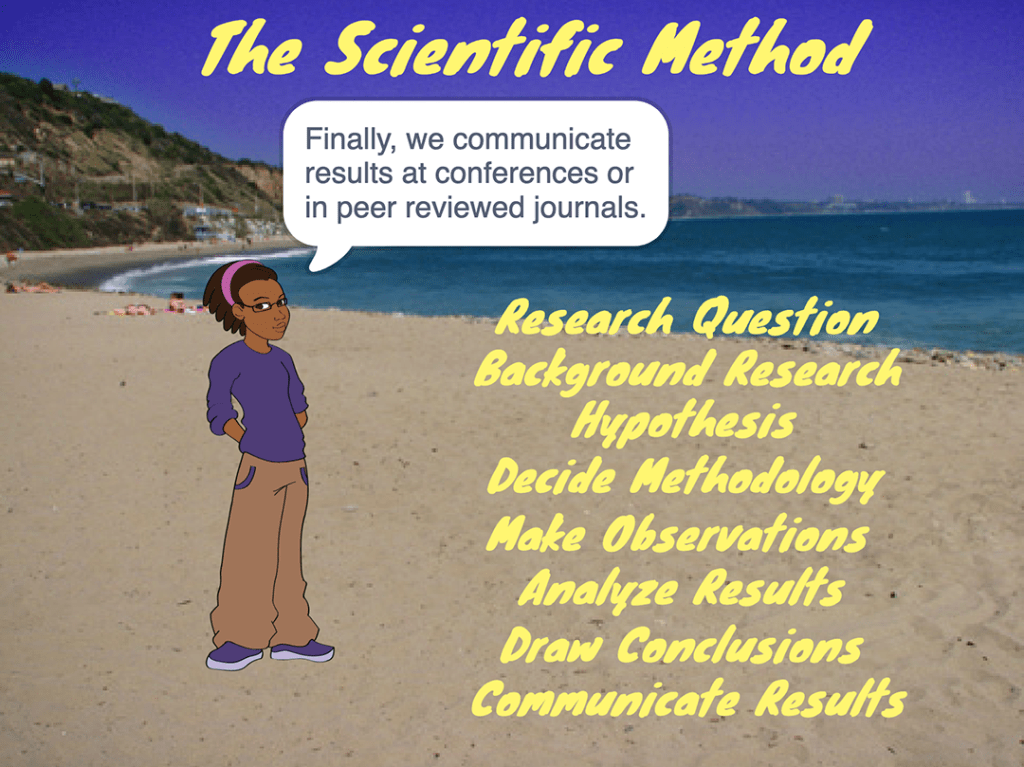
Scratch is a game development platform created by MIT that allows an easier route to learning programming. Instead of having to write programs using lines of code, or scripts, it is designed to use modular blocks arranged in sequence with the ability to modify their parameters. The blocks are arranged by category and include blocks for events (such as waiting for a mouse to enter or leave an object); blocks for commands such as if-then statements and loops or for moving or changing sprites; blocks for operators such as Boolean controls, variables, and random number generators; and so on.
Scratch uses a theater metaphor; the area where the action occurs and the program displays is called the Stage. The objects that can be programmed include Backdrops and Sprites (instead of actors or characters). Sprites can include different Costumes that can be swapped out depending on conditions. All of this is controlled by the Script, or sequence of blocks. The programming can be linear, where the user simply watches events unfold, or it can be interactive.
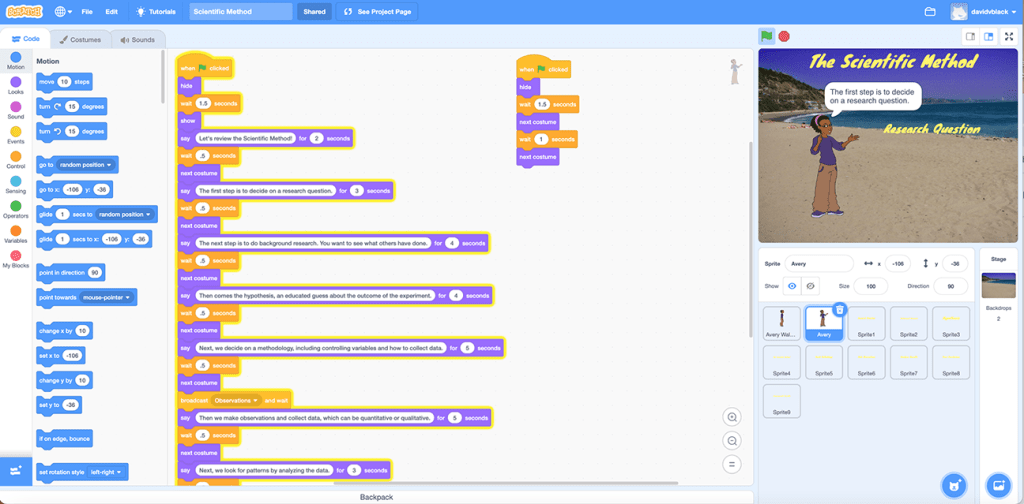
Let’s begin with linear animations. My Scratch Video 1 explains how to set up and control two sprites that are timed to move around the stage and apparently carry on a conversation with speech balloons appearing at carefully timed intervals, as shown in the blocks of code at left. The costumes of a sprite can be swapped in a loop to make the sprite appear to walk (what we call a walk cycle) as it glides across the stage. Sprites can be flipped, resized, hidden and shown, and their opacity changed. In this example of a linear animation, a sprite walks into the stage from the left, pauses but has occasional gestures, and speaks about the steps of the scientific method while text appears on the stage timed for each step.

Here is a conversation between two sprites, the Scratch cat and a Dalek from Dr. Who, about the metric system. Of course, the cat gets exterminated.
In each case, the only user input event is to click on the green flag, which starts the program running. Everything from then on is inevitable and linear; the user has no control over the direction or outcome. Even so, such an animation can be an effective way of teaching a concept or demonstrating mastery. Any time you need to present an idea in a start-to-end linear fashion, this kind of Scratch animation can be an effective tool.
One disadvantage of Scratch is that it cannot export to other formats such as a standalone movie or an HTML document. You have to be inside the Scratch environment to play Scratch files, but signing up is free and there are many examples of great programs others have shared that you can use as examples to reverse engineer. It is also a great way to begin learning the structures and principles of computer programming.
Interactive Game or Quiz with Scratch:
Scratch is also an excellent program to learn game programming. In my second Scratch Video on the Software Training page, I explain how to use basic programming structures such as if-then statements, variables, operators, random number generators, loops, keyboard controls, etc. Since all of these codes are contained in easy to use blocks with changeable parameters, game programming is quite easy in Scratch.
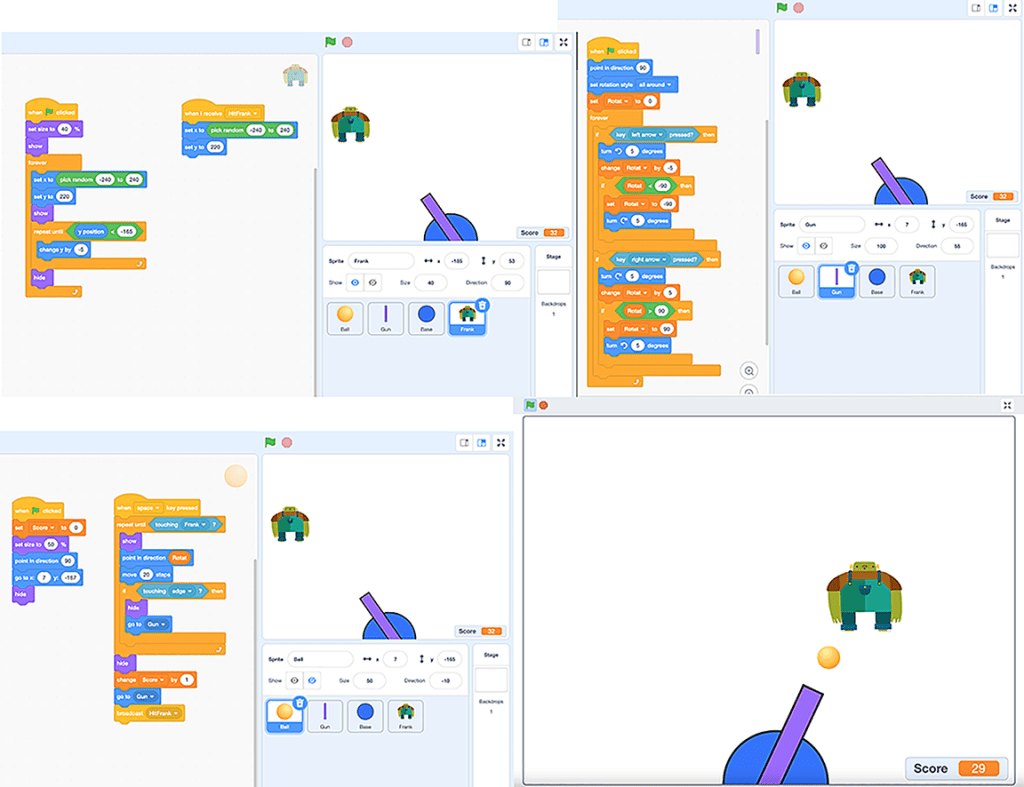
Let’s imagine we are doing a Space Invaders type of game such as the basic one shown here. The Frankenstein’s monster sprite (Frank) is programmed to pick a random horizontal position and start at the top of the stage and move down at a specified speed. Once it reaches the bottom, it resets to another x position and starts descending again. If the cannonball hits it, it disappears and starts at the top again. The cannon is just a rectangle that is rotated around its center point using the left and right arrow keys. If it reaches a rotation of either positive or negative 90 degrees, it stops (basically, it resets to 90 each time). When the space bar is pressed, a cannonball fires and moves in the direction that the cannon is pointed (an unanticipated result of this that if the cannon is still rotating, the ball will curve). When the cannonball hits the side, it returns to the start position. When it reaches the top, it resets. If it hits Frank, the score variable goes up by one.
To build this game I simply got one thing at a time working: Frank descending and starting over from a random horizontal position, the cannon rotating, the ball firing, the sprites detecting a collision, the score going up by one. If something doesn’t work, or works unexpectedly, you need to put yourself in the position of the computer, which cannot think or read your mind. It can only do what you tell it to do through code.
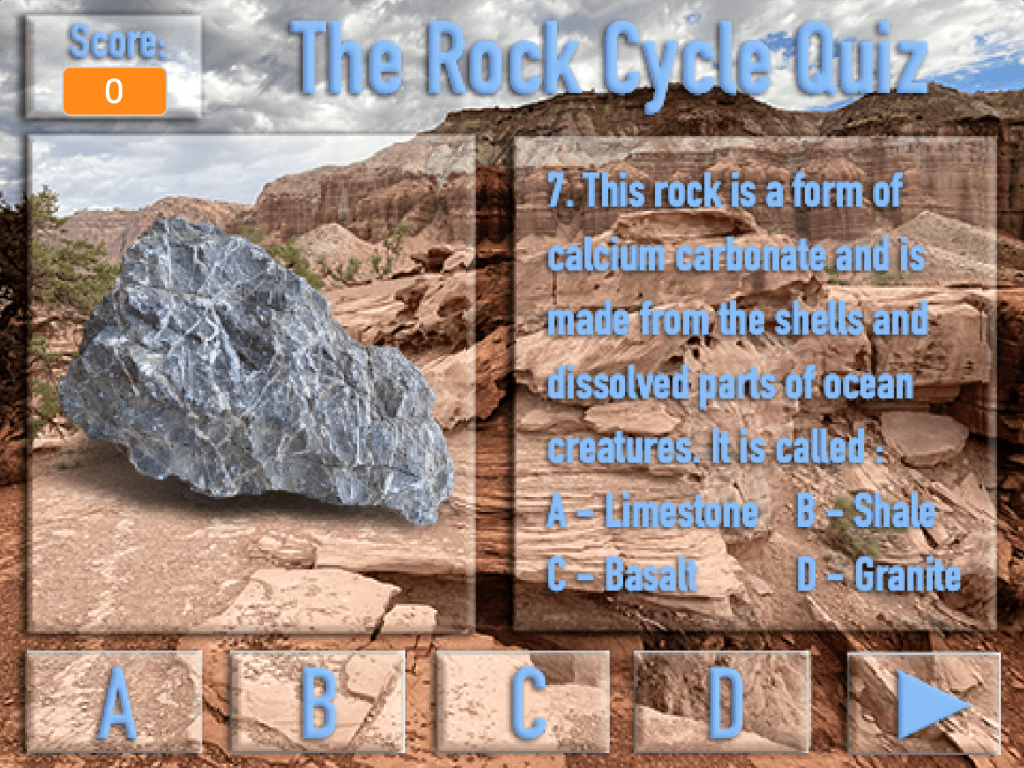
Here is another example of a quiz on different types of rocks. I demonstrated how to design this using Photopea or Adobe Photoshop in the video, including how to make the background, the buttons, the questions, and so on. Each button has three costumes that respond to mouse events. When the mouse is touching the sprite, the costume switches to an Over version. If it rolls back out, it switches back to the Up state. If both the mouse is in the sprite and the mouse is pressed down (the And Boolean operator requires both to be true), the button changes costumes to the Down version. Then on releasing the mouse, a bunch of sequential if-then statements compare a randomly chosen question’s correct answer with the number of the button and if they match, it adds one to the score and picks another question.
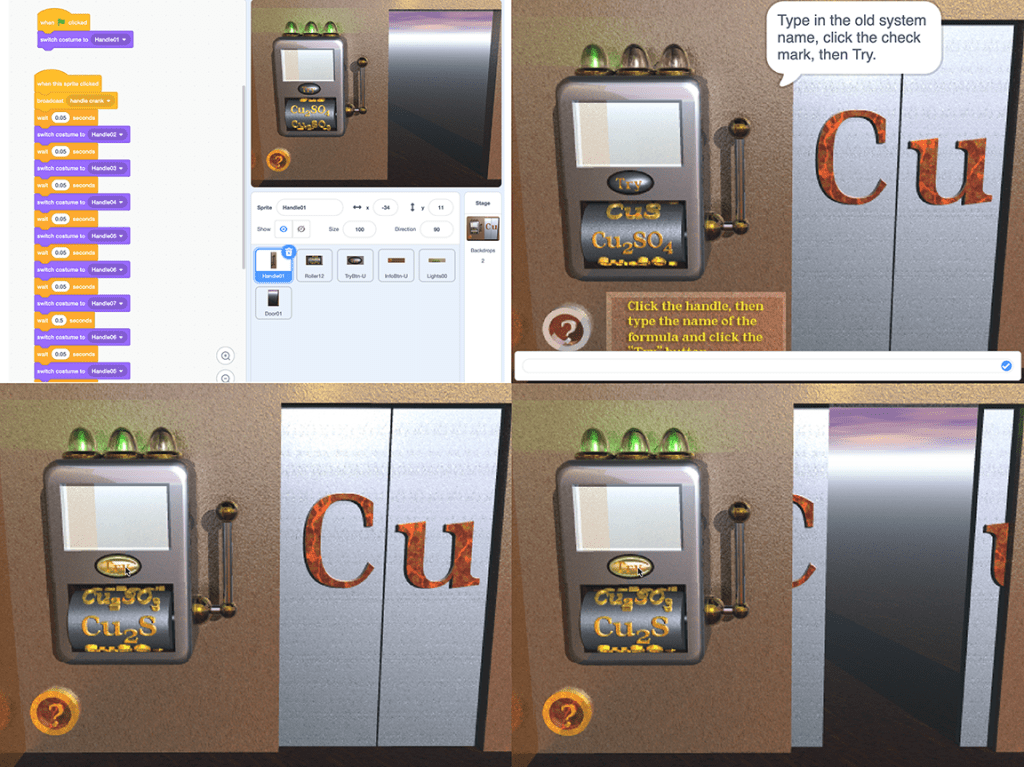
Here is a third program, this time more like a game. It is a kind of slot machine, but not for gambling. It is to test your knowledge of the names of copper compounds. I designed the interface as a 3D model and created animations for the moving parts such as the handle and the formula cylinder, then rendered out all the frames of the animation and carefully stacked them together in Photoshop and separated out the same section for each frame for the handle, the lights, the cylinder, the button rollover states, and the door open frames. Then pieces were imported as sprites and costumes and programmed with code blocks.

The only thing I could not get to work in Scratch was that it doesn’t seem to have a way to do a transparent text box – I wanted to place one in the window above the Try button. So I had to put in a user input text box at the bottom with an extra instruction balloon, but it is basically functional. Watch the video to see how it works.
The possibilities are endless. Here is a game for testing yourself on lab safety, with 50 possible randomly selected questions so that every time the quiz is taken, it is a different experience. Once students finish, they can show their final percentage to their teacher.

My students have worked on a continuing project based on the periodic table called Mendeleev’s Maze of Madness, where players starts at the bottom of the table with the rare earth elements and have to work their way up to hydrogen or helium, moving from element to element like moving from room to room in a tower. My formula machine game is an example of moving from the zinc to the copper room.
My students have chosen their own elements and created games, such as this Bismuth Belly Buster game where they have to assemble a molecule of bismuth subsalicylate (the active ingredient of Pepto Bismol), or the game at right which is a word search about strontium. Ultimately I hope to develop a VR game of Mendeleev’s Maze. It could contain much of a high school first year chemistry class in one game.
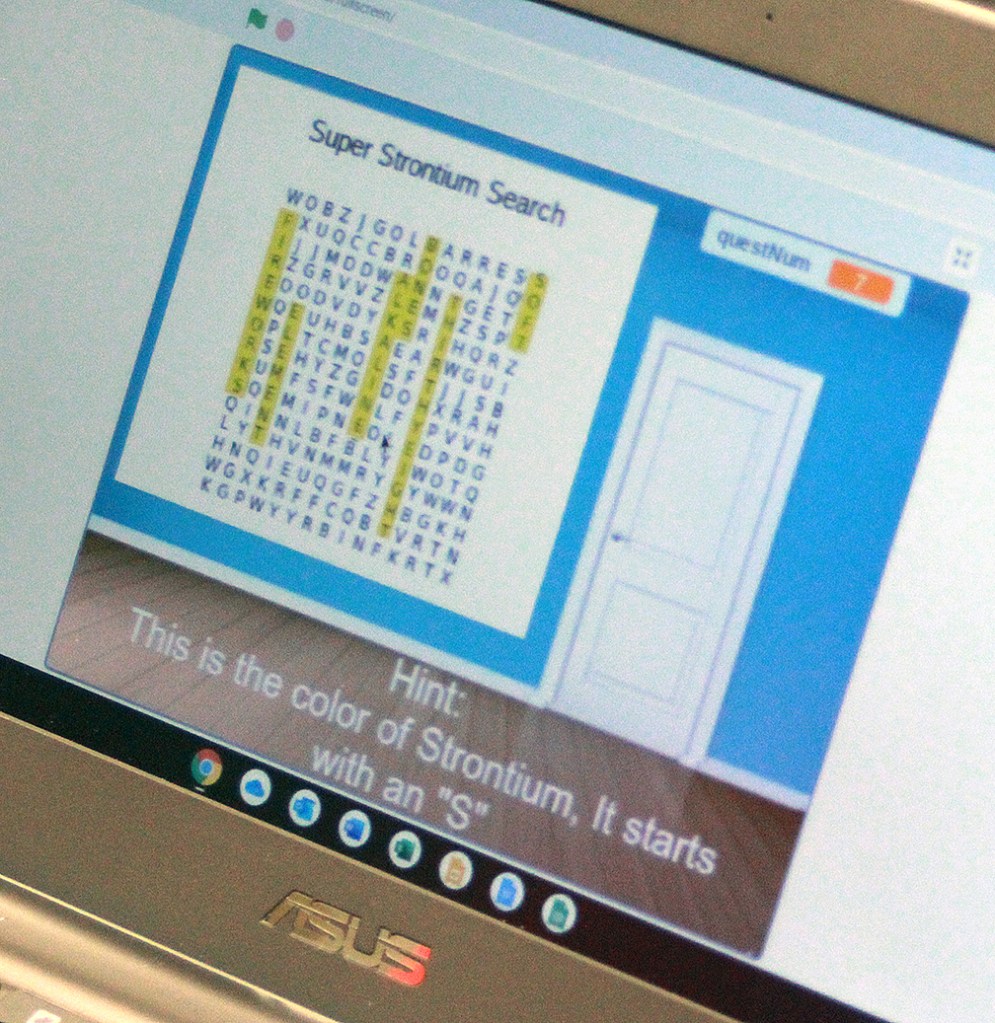
Imagine doing such a game yourself for your chemistry class, or designing a quiz to test a concept, or creating controls for rotating images (switching costumes) for a 3D model of a molecule or a dancing alien, or so many more ideas.
In these final programs of Wick Editor and Scratch, you are reaching the ultimate of student-created digital media production where you must combine other programs (3D modelers, Photopea, etc.) to make the pieces, then import and code them in these interactive programming environments. With careful planning and thought, you can create whatever you can imagine.
Simulations in Scratch:

Because Scratch is an excellent environment for programming games, it can also be used for simulations. The variables can be set as text boxes to show values or they can be set to sliders to allow direct interaction, with the position of the slider lever becoming the variable. Any of the simulations talked about in Wick Editor can also be done here and probably done easier. One can imagine all sorts of physics simulations.
Scratch does have one limitation, which is that it is not a timeline or frame-based program. All you have is the one Stage, so if you want to do a branching program that shifts between interfaces, you will have to either hide all of the existing interface parts, including swapping the backdrop and hiding all the buttons (which are still all there), then showing the new interface sprites, or you have to design the backdrop as a set of costumes that switch as you move up levels. In that case, the buttons would remain in the same places and have the same functions, and the positions of Sprites can be reset. Imagine a maze game or some version of PacMan – the PacMan sprite can be reset to the correct edge of the new maze and it will bounce off the wall using the Touching Color brick, so that any costume will work as long as the walls are the same color. Bonus sprites and Ghost sprites can be placed at random or set at specific places depending on which costume is in the backdrop.

Scratch can also do draw commands, so you can control how the pen moves, its color, width, speed, and so forth using scripting. I had an advanced student once create a Spirograph program in Scratch using curve formulas for the pen tool. Here are two examples of much more simple drawing programs, the first using arrow commands and a variable slider, the second drawing automatic hexagons in a loop that is offset each time through, but also uses a Change Color brick to step through colors 10 values at a time.
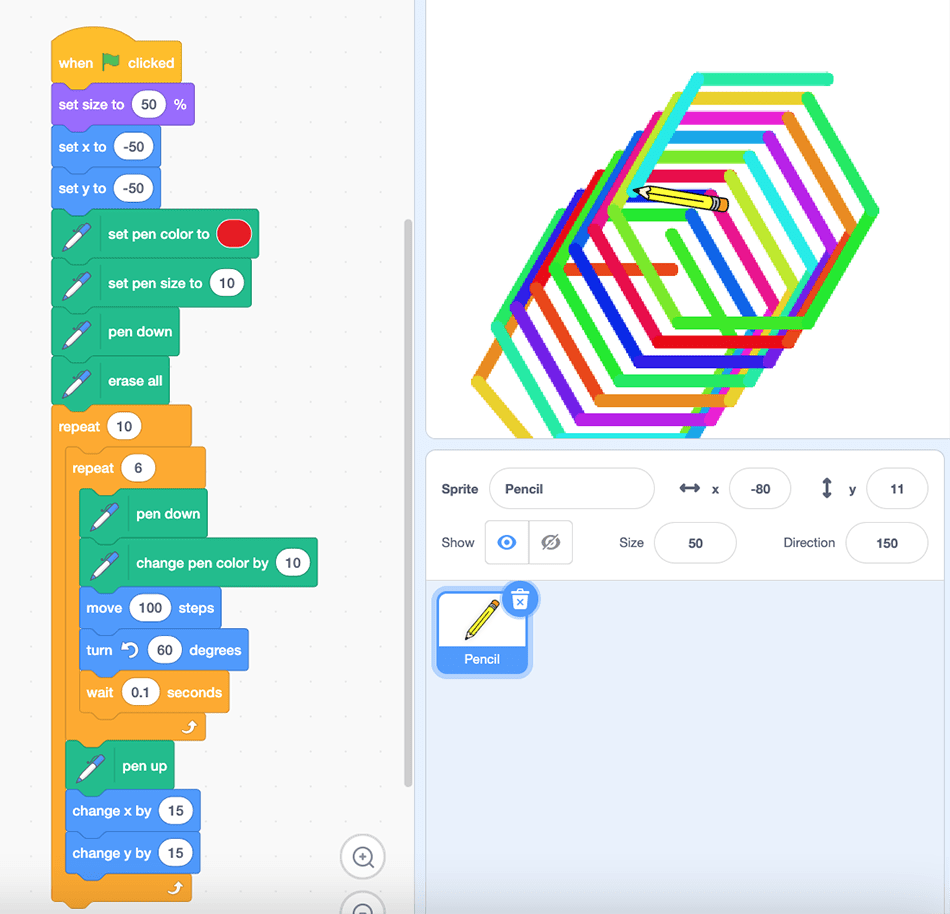
Imagine activating different types of shapes using a keyboard command, such as the letter E creating an exponential curve or P creating a parabola or C for a circle, with sliders to determine the values of x and y in the equations. This would be a great way to reinforce the equations for different types of shapes in a math class. Imagine creating a Moon landing simulation (which was the first digital game I every played, although it was actually on an HP programmable calculator and only used numbers). The graphics could be so much better. A variable could be shown to track remaining fuel and sliders and arrows for thrust and directional controls as you play Neil Armstrong and hop craters to find a flat landing area, slowing down your horizontal velocity while counteracting the Moon’s gravity. Hmm – I should try that!
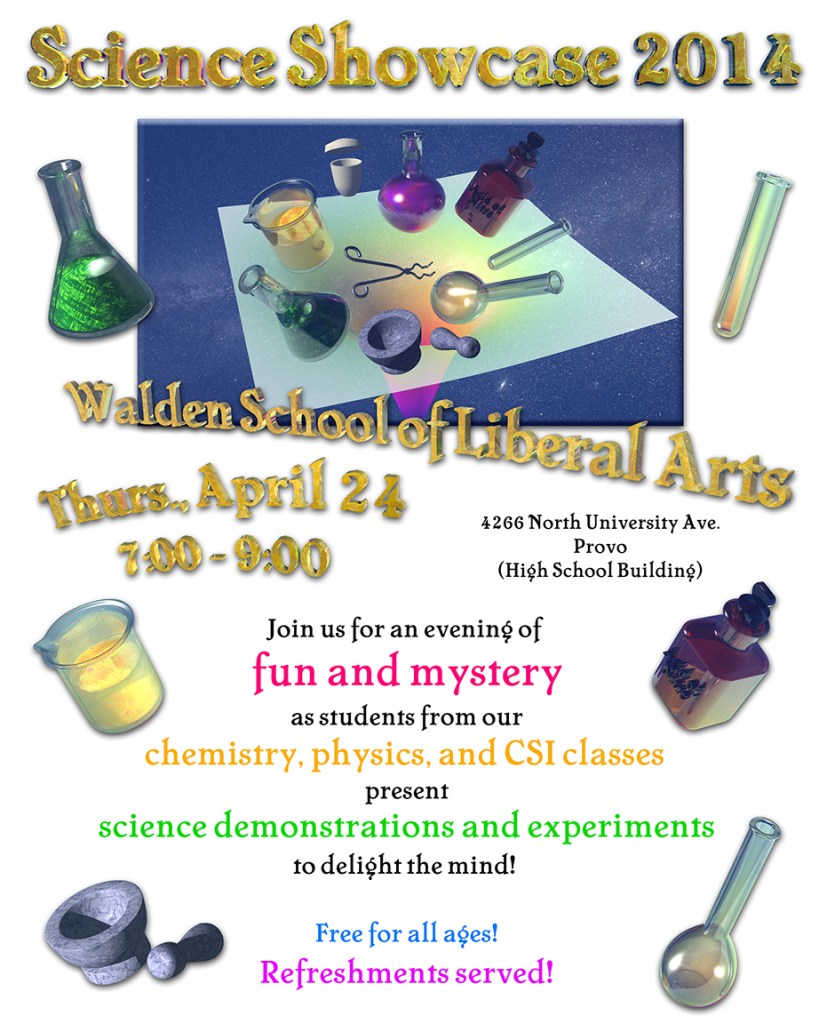
Multi-Vector Combination Projects:
So far the projects described here stay within a single software package (with the addition of Photopea, which is essential for image creation for all the rest). But what if you need to build a more complex project that has multiple parts and uses many types of software? I call such a project a multi-vector project. In this last section, I will give you some examples as ideas to use if you are a STEM teacher.
STEAM Showcase: Each year, whenever it has been possible, I have my STEM students prepare for an end-of-year community event I call the STEAM Showcase. Starting in February, students create partnerships and decide on a topic related to their class (chemistry concepts for chemistry students, for example). Their goal is to create a short 15 minute mini-lesson/demonstration/activity that they will present three times.

The first time is to their peers in class in late February, for which they receive feedback. Then they look at the suggestions and make improvements. The second presentation is in late March to students in a nearby elementary school or, if it is a K-12 school, to the lower grades. I work with the elementary teachers in advance to find the science topics they will be teaching at that time and match up the students’ topics with the teachers’ needs. My reason for doing elementary presentations is to train my students how to explain science concepts as plainly and simply as possible – if they can explain it well to a kindergartner, then they truly understand the topic. The teachers provide feedback and students revise again.

The third presentation is for an evening event – the actual STEAM Showcase. We create a schedule, take over 5-6 rooms, and present 5-6 sessions of 20 minutes each (15 minutes per session with 5 minutes for passing). We invite in all the parents, siblings, and community members we can find (we advertise with flyers sent home and posted around the community). I provide a short introduction and then its off to the races. When students aren’t giving their presentations they are helping with traffic and ushering, with photography and videography, with keeping refreshments stocked (we often make homemade root beer and ice cream for root beer floats).

The final presentations have several parts. First, the teams have to write up their presentation outline or script. Then they create a presentation along with some kind of hands-on activity or demonstration to last 15 minutes. Then they create a 1-2 page handout with URLs, information, diagrams, etc. to provide further resources on their topic. At the end, after presenting these three times, they have the opportunity to debrief, discuss how things went, and write a reflection piece on what they learned. Frequently students say this is the most fun thing we do all year and certainly the most memorable. I have now done this six times total and will do it a seventh time this coming April 2023. Students are beginning preparations now.

Big Organ System Project: In years when I could not do a STEAM Showcase or in schools were it would not be feasible (such as the Residential Treatment Center I used to work at), I find some other way for students to create a large-scale, complex, multi-vector project. In biology classes we are studying human anatomy at the end of the school year, so for a final project student teams choose an organ system such as the nervous system and create a presentation, handout, a working model, and some kind of activity or game to reinforce learning. I have seen some very creative ideas, games, and models presented.

Rube Goldberg Device: In physics at the end of the first semester or whenever I finish with classical mechanics, I teach a unit on work, energy, power, and simple machines. To wrap this up, student teams have to create a Rube Goldberg device to accomplish some simple task in as complex a fashion as possible, using all six types of simple machines (wheels, pulleys, levers, inclined planes, wedges, and screws) with at least eight steps and testing for the number of successful repetitions. Right now, that stands at 25 runs in a row, a very hard standard to beat. I bring in a bunch of random stuff such as toilet and paper towel cardboard tubes, various balls, weights, pulleys, springs, wheels, pool noodles, electric drills, hot glue guns, hacksaws, and so on.

This year we are just beginning this project. I presented a series of YouTube videos to them on the first day to provide excitement and establish requirements. For example, we look at the Rube Goldberg video created by OK Go for their song “This Too Shall Pass” and continue to the parabolic flight “vomit comet” video for “Upside Down and Inside Out” and the extremely slowed down video for “The One Moment.” I show the TEDtalk video for OK Go on how they find new ideas. I show elaborate marble run machines, a hand cranked marble run/music box machine, and even the squirrel maze videos by Mark Rober.
Here are links to some of these videos:
OK Go “This Too Shall Pass”: https://youtu.be/qybUFnY7Y8w
OK Go TEDtalk: https://youtu.be/WyOSqjIABe0
Marble Run Video: https://youtu.be/PDZaQDJoz0Q
Marble Music Box: https://youtu.be/IvUU8joBb1Q
Mark Rober Squirrel Maze: https://youtu.be/hFZFjoX2cGg
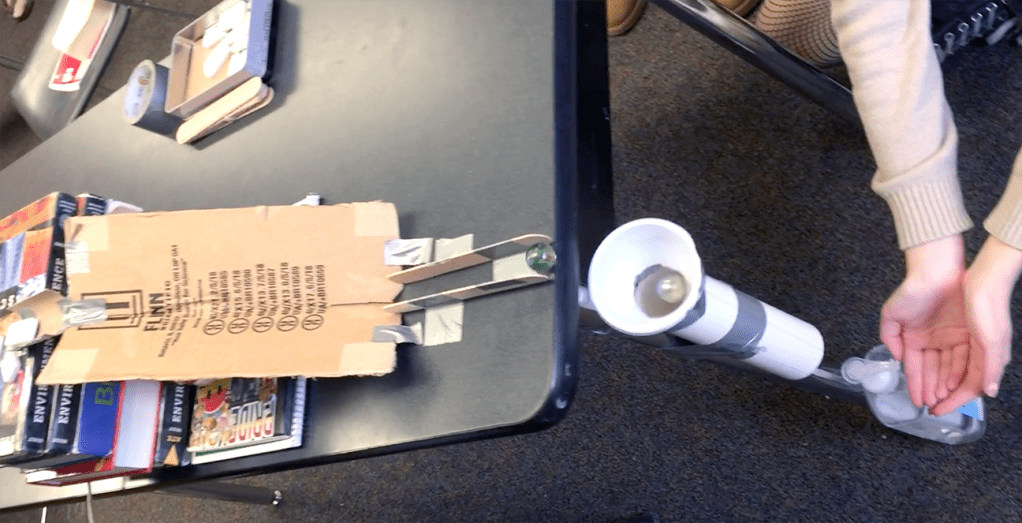
On the second day I show details on the requirements, specifications, grading, assignments, timeline, etc. and students form teams and begin to brainstorm ideas. To move this along, they are required to turn in an initial sketch of their ideas. Then comes the media design software integration: I am having them create 3D diagrams of the machines and turn them into animations showing how it will all work (in theory). This will take a few days of them watching the software training videos, getting additional help from me as they create the 3D diagrams and animations.

Once the planning is done they move on to building a prototype, testing it, revising it, until it can work consistently and/or continuously. This time I am giving them three levels of choice: Choice in type of project (it can be a Rube Goldberg device, a marble run, or a perpetual motion machine); choice in the software they will use to create the diagrams and animations; and choice of the exact approach of their project, such as what types of machines to put where and how. On the final day, which will be Feb. 28, they will compete to see which machine is the most reliable and consistent, with the winners getting to present the whole class’ machines as their STEAM Showcase presentation. After the final competition day, they will take a day to fill out a survey and write reflections of what they learned and how they could do better.

Chemical Reactions Project: In about two weeks my chemistry students will be ready to start their final in-class project before the STEAM Showcase preparations begins in earnest. This will be to create a project that shows their mastery of a topic related to chemical reactions, including the choices of types of reactions, balancing equations, stoichiometry, and limiting reactants/percentage yield. They have three levels of choice as well: choice of topic, choice of the type of software they will use, and choice of their project type or approach. They will be able to use any of the software packages and project types listed here as long as it is on one of the four reaction topics.
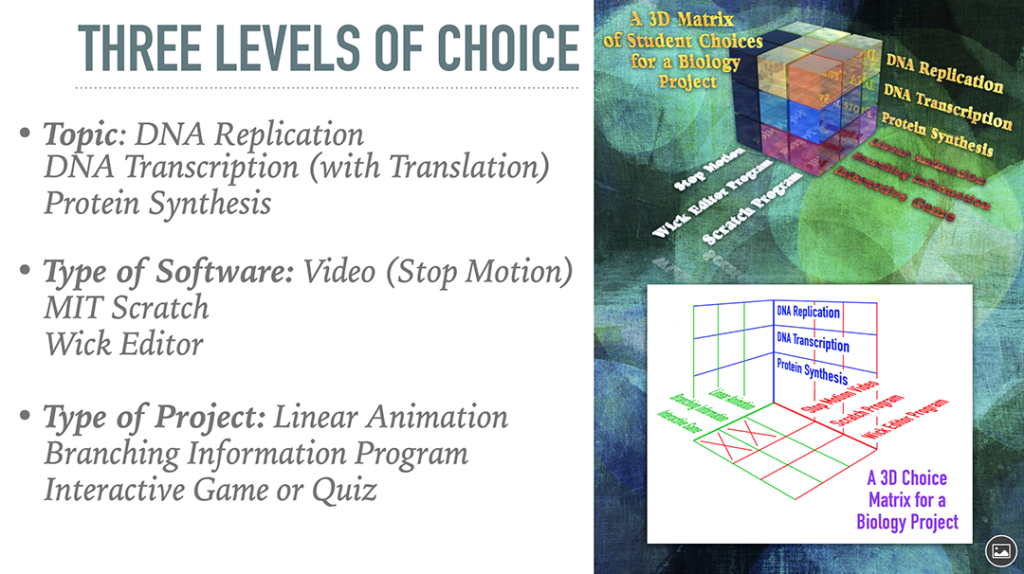
Biology DNA Animations: For biology, which has eighth grade students, I have constrained the choices a bit more and provided additional structure. Their project will be to choose one of three topics: DNA replication, DNA transcription and translation, and protein synthesis. Then they have a choice of three software packages (Wick Editor, Scratch, or stop motion animation with video software) and a choice of three types of projects: a linear animation, an informational branching program, or an interactive game or quiz. Since stop motion animation can only produce a linear video and not a branching program or interactive game, the possible permutations are 21 combinations, which should be plenty for that age of student.
I look forward to seeing how these projects progress, what the final products will be, and what students will learn from the process. This will be a major part of my dissertation research data, and by the time it is all collected, the school year will be ending and I will need to spend the summer compiling the results and drawing conclusions for the final dissertation defense, which will be this fall.

Now that my project descriptions are complete and some training videos completed, I am ready to start promoting this site and asking other teachers to participate so that I can collect data beyond the school I am teaching at. If you are a student or teacher reading this and you want to participate in my dissertation research, please contact me at: elementsunearthed@gmail.com.
