
Over many years of teaching students how to plan and build excellent projects, I have found that most have difficulty in the crucial planning phase. They often go with the first project approach that comes to mind and jump into creating it without spending enough time and effort to carefully plan out the scope and steps of their project, which is often harder to finish than they anticipate. They procrastinate doing the actual design work and have to scramble to get it done in time, and quality suffers.
In this post, I will walk you through the steps of a potentially winning project and how to avoid the pitfalls that so many students get trapped in. The project will be a graphic novel or comic book about exploring the solar system, including the history of space probes and what we’ve learned about the planets, moons, and other solar system objects. To arrive at the project’s concept, the first step is to decide which topic to pick.
Choosing a Project:
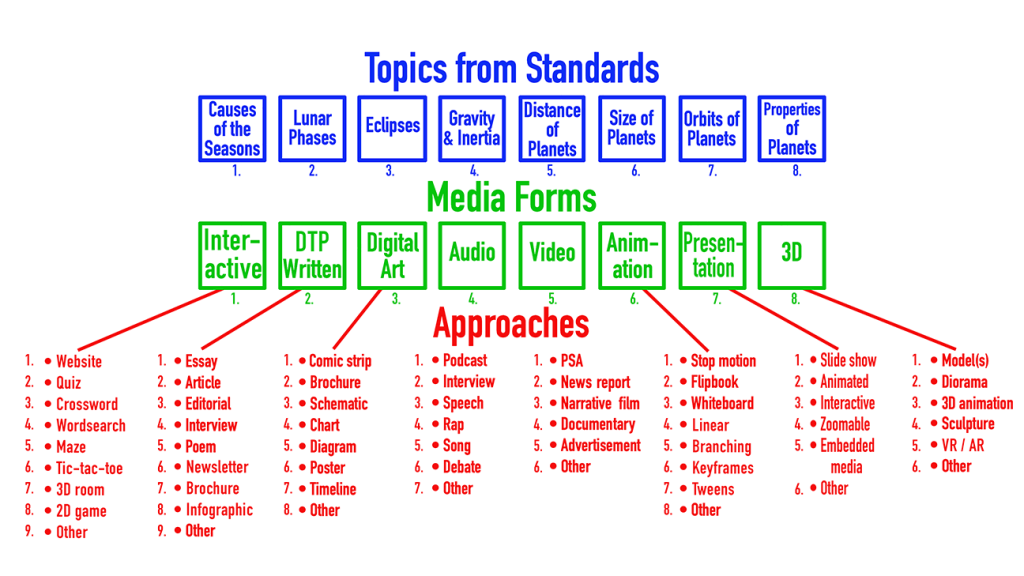
Let’s say my name is Bob and I first wrote down a list of topics, software, and approaches that appeal to me. I want to maximize what I learn from building this project and decide that learning about the properties of each of the planets, moons, and solar system objects and how we came to know these things would be interesting to learn and would give me the best return on time and effort. I like to draw and want to incorporate fine art drawing skills into my project, but know that some digital media integration is required. Looking over the software and possible approaches, I decide that I enjoy reading manga and other forms of comic books and graphic novels, and the best software to create my own would be Photopea.

Research and Practice:
After I finish watching the introductory videos I start in on the Photopea lessons, watching the Basics lesson and then focusing on the Colorizing Line-Art series, which are videos C through F. I learn the skills and complete the practice project. In the meantime, I start researching the history of space exploration and the space missions and probes we’ve sent out since 1957 when Sputnik I launched. I take notes, read NASA web pages, and learn about the planets.
Planning:
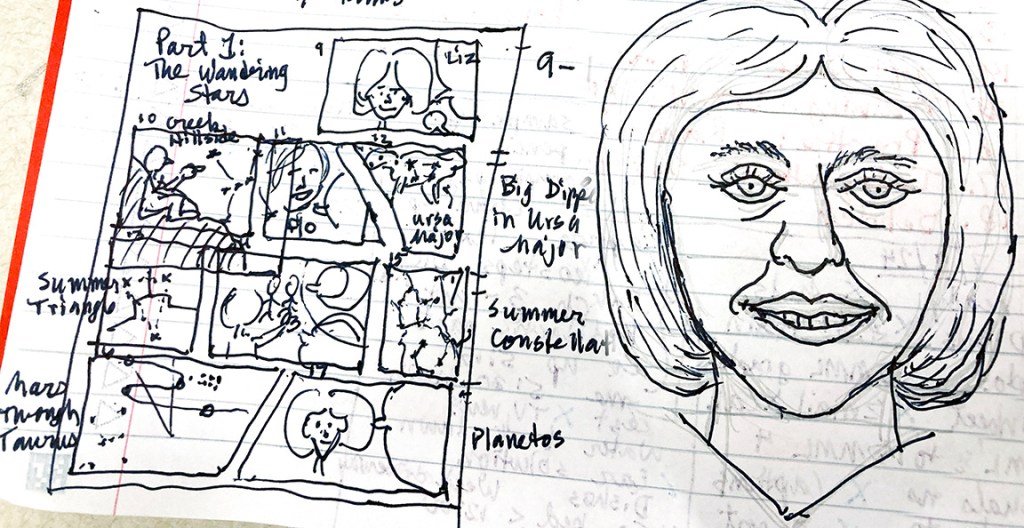
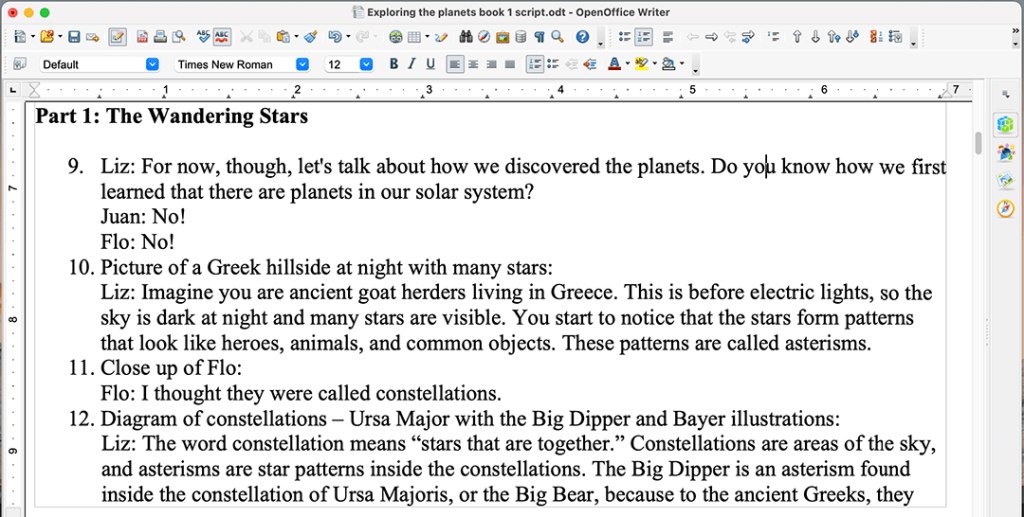
The next step is to write a script and plan out each of the pages and panels of the graphic novel. I give each panel a number and write what the scene shows including characters and scenery and what each person is saying. I know that trying to say too much takes up too much room, and that graphic novels are mostly a visual medium using still images. That means thinking through the camera position (or position of the viewer) and planning establishing shots, close ups, and medium shots to tell my story visually and convey the message about the history of planetary exploration. I have to think of other scenes that the viewer would be asked to imagine of space probes orbiting Jupiter or landing on Mars or launching from Earth. I would look up photos of these things and practice sketching them out, then create the characters I will be showing and sketch them from different angles and with different expressions. These are called character sheets.
So far I haven’t actually begun the project. This might seem like a lot of work, but in the long run it will save time to put in all this preparation. Once I begin the actual drawing and production, I won’t have to erase and backtrack because I’ve already thought everything through. My project will have greater quality as a result.
Page Layout and Drawing the Panels:
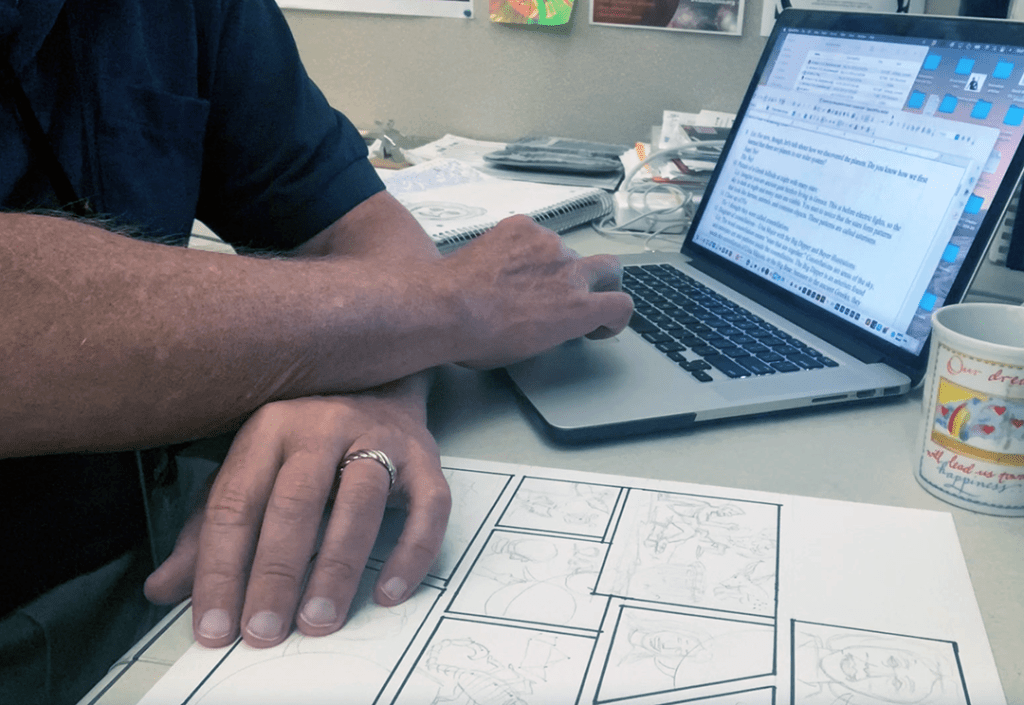
With sketches and script done, I am ready to start producing the final project. First, I lay out the panels carefully on white Bristol board or other thick, smooth paper. It is good to use a regular grid pattern for the panels but also to break out of it with non-rectangular panels, overlapping panels, and characters and objects that break out of the edges. Sometimes you don’t need to show every detail of every object – just enough to suggest texture or details, such as showing a person’s torso without their entire body. Or drawing a few bricks to suggest an entire wall. Don’t forget to leave enough room for the speaking balloons or text boxes; here’s where your script will be very important. Say the minimum you can to avoid giant speech balloons, because this is mostly a visual medium. If a scene is more important, make the panel larger. Sometimes a panel can fill up an entire page.

Next, I draw in the scenes, including characters, objects, and speech balloons or text boxes. This is all done using a No. 2 pencil so it can be erased easily, and I do not use any shading, just lines. I leave the text balloons empty for now – I will add the text inside Photopea. With the lines complete, I use a ruler and a thick black pen or marker such as a Sharpie to go over the panel edges as carefully as possible. I then use a fine black marker such as a Micron pen to ink in the lines of each scene. If I make a mistake I know that it can be fixed in Photopea. Then I erase any pencil marks that can still be seen.
Now comes the digital media part of the process. I find good, even lighting such as in the shade outside or under a bright white light such as a white LED or compact fluorescent light with a temperature of 5230 ° Kelvin. Any other temperature and the light will be too yellow or too blue. I photograph each page from several angles, making sure to not cut off any edges or corners. I could also use a scanner.
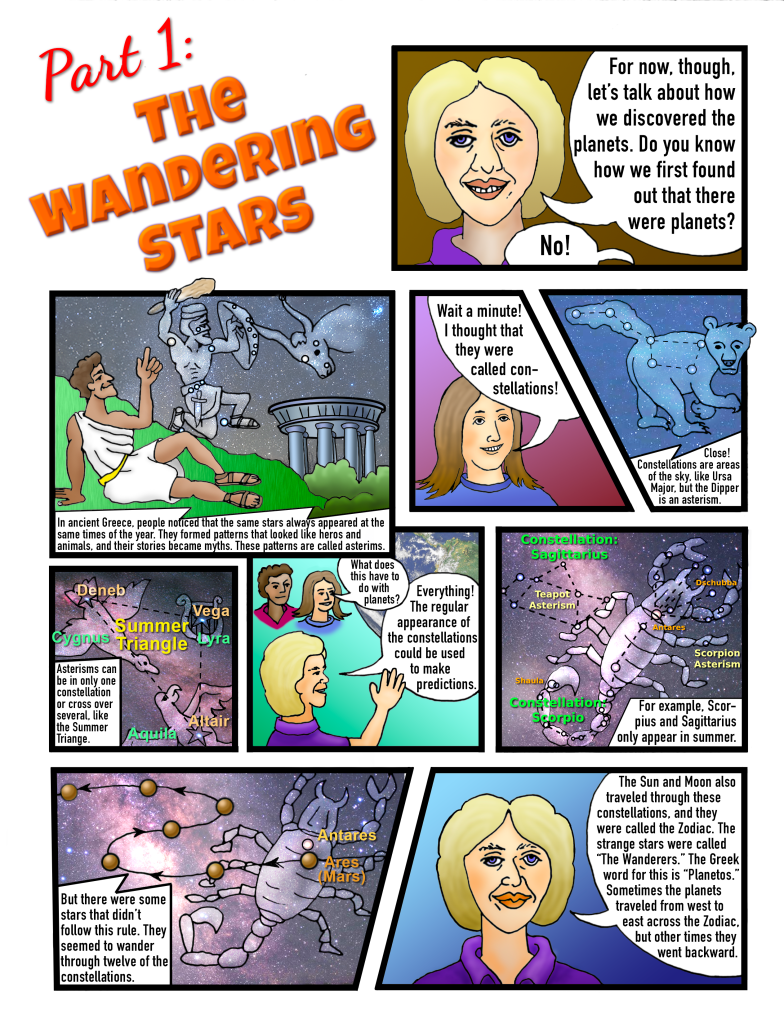
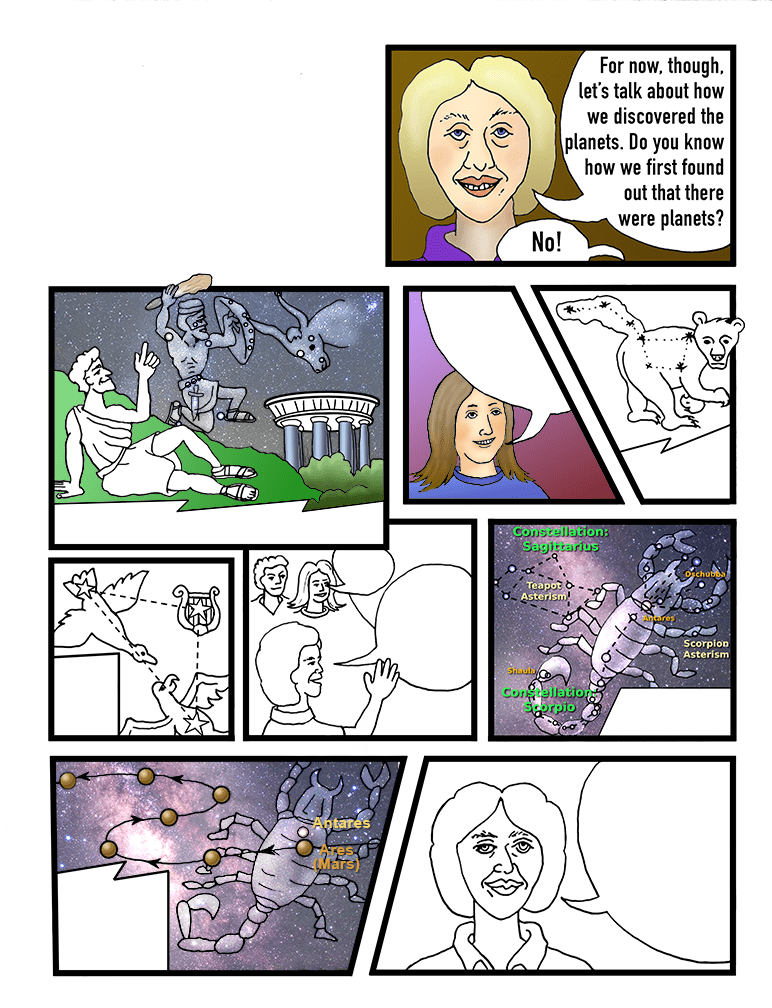
I open up Photopea and choose the Open From Computer button and navigate to the best version of the page I want to work on. For our example here, this is page two of my graphic novel on exploring the planets. This page teaches about how ancient Greeks saw the regular appearance of the constellations at the same time each year, but also noticed there were some stars that moved through the background zodiac constellations. They called them “wanderers,” or in Greek “planetos.” Because they seemed to have minds of their own, they were named after the gods and goddesses.

Cleaning the Line Art:
To clean up the black line drawings, I first have to make sure the lighting is bright and the lines are horizontal and vertical for the panel borders and not distorted. To undistort, I pull guidelines in from the rulers on each side until they just touch the outside corner on each side. Then, selecting the image with the rectangular marquee selection tool, I choose Edit-Transform-Distort and pull each corner of the image borders to match the corners of my guidelines. This turns my image into a rectangle. I hit Enter and Deselect and delete the guidelines, then select the image with the marquee again and crop it to get rid of any unwanted extra edges.
Next, I fix the resolution, lighting, and smooth up the lines. First, I turn the image size up to 12 inches tall and 350 pixels per inch. I choose Filter-Blur-Gaussian Blur and blur everything by 2 or 3 pixels. This will make the edges of my lines softer and smoother. Then I reduce the image size to 11 inches tall and 300 pixels per inch and choose Filter-Sharpen-Unsharp Mask, moving the sliders to 125% and half as many pixels as I first blurred the image. This will improve the quality of the lines. Now I do one more thing: Under Image-Adjustments-Levels, I move the top sliders inward, both the white slider and the black slider toward the middle. This makes the white areas whiter and the black lines blacker. If I move the black slider in more than the white, my lines get darker and smoother. I also got rid of most of the remaining pencil marks; any more remaining can be erased with the eraser tool. I can also adjust the brightness and contrast to see if that helps.
At this point I am almost ready to add color. I inspect my drawing and make sure there are no gaps in the lines. I fill them in with the brush tool set to a small size and medium softness, using black to make the lines more solid and white to erase stray lines or mistakes. I don’t use the eraser tool in Photopea as it erases to transparent instead of white, which can cause problems later. A white brush will do the same thing here.
Adding Color:
With the lines cleaned up, it is time to add the color to this digital coloring book. I keep the black and white lines in the background layer to use as a selection guide and add color in upper layers. I add a new layer and name it Color. All of my basic color should go here and not on the background. To put in a solid color, I click on the background layer and use the magic wand, set to a tolerance of about 40 and to Contiguous, and click on the area where I want the color. I can use the Add to Selection option to click on additional areas. Then I choose Select-Modify-Expand and expand by two pixels and click OK. Next, after clicking on the Color layer, I choose my desired color from the color picker, and choose Edit-Fill. At this point I have a solid color in the selected area, but it seems to have cut off some of my dark lines. To avoid this, I set the Color layer to Darken blending mode. This makes Photopea choose the darker of the two overlapping pixels and prevents any light gray edges from spoiling the look of the color.
Now solid colors may be fine for some parts of my image, but using gradients and other effects will be more interesting to look at. Using the same process of selecting an area in the Background layer, then expanding the selection and activating the Color layer, I choose the gradient tool and pick my starting and ending colors. If chosen carefully, I can mimic a dimensional effect such as the lighting and shading on a cylindrical or spherical object. A sphere starts with a light tint of a color, then goes to the basic color, then a darker shade, then back to a medium tint again. I set the gradient to Radial as the type and drag the gradient from where I want a highlight to start across the center to the opposite edge. With practice it will look like a sphere. For a cylinder, the colors go from medium to light to dark back to medium and I drag the gradient from one edge perpendicular to the direction of the length of the cylinder.
Shading and Highlights:
I use the Dodge and the Burn tools to add some highlights and shading to my colored areas, such as the teacher’s hair. These tools are meant to mimic the effects of lightening and darkening areas of a photograph during the enlarging process in a darkroom. I set my brush to medium size and 0% hardness with exposure set to about 15-25%, then carefully draw in the highlights or shadows and quickly undo any mistakes. As I paint over the same area, the effect strengthens. I remember to select the colored area in the Background layer, then activate the Color layer before doing this so that my other areas will be protected.

Images as Textures:
I can find photographs that have good textures, such as skies with clouds, fields of stars and nebulas, grass, or the bark of trees and place them inside areas of my drawing. I open them up into Photopea, then select and copy the desired areas, go to the coloring book page, and paste the selected area into a new layer. I can move the texture around, resize it, distort it, or add to it in its own layer. I then use the Background layer to select the area where I want the texture to show up, expand the selection again, and choose the Layer Mask button at the bottom of the Layers window. All areas outside of the selection seem to disappear but they are just masked. I can adjust the mask part of the layer or the image part of the layer to adjust this effect.
Using all of these techniques, I work area by area and panel by panel to add color throughout the image. I remember to keep my background lines pristine so that I can always select them again and make changes. Once all the areas are colored, I use the text tool to add words to the speech balloons. I keep all of the image areas, gradient areas, solid colors, and text as separate layers as long as possible, and remember to save out a PSD file with all of the layers intact in case I need to make more changes. At the end, I flatten the image and save it as a PNG file with high resolution.

There! I have a completed page for this graphic novel project. This may be a slow and painstaking process, but Ids can decide how many special effects, image textures, and gradients to use. Putting in solid colors works and is fairly easy; the hard part is drawing the images, inking it, and cleaning up the lines. Adding color is fairly straightforward.
This graphic novel project is just one possibility from many that you could choose for the Cosmic Creator Challenge. You are practicing digital media software and developing useful creative skills while also learning about space science. Through the media you create and share, you are also teaching other students what you have learned. Your goal is to create a project of excellent quality that is scientifically accurate, creative, helps you learn the software, and effectively communicates space science concepts. We need more people who not only understand STEM fields but can get other people excited about them. You are learning how to do just that through your Cosmic Creator Challenge project!

Leave a comment